
Connecting a helpdesk to your Github
This short guide is intended to help connect a helpdesk to your Github so that you can go about making your life simpler and avoid manual data input!
Some pre-requisites:
-A OneDesk account (even our trial version works too!).
-Your Github account.
-A Zapier account (the free version should be more than enough).
-The Private link to access our OneDesk app in Zapier:
https://zapier.com/developer/invite/42966/4e4907110b905debeb6a129130fa5c0b/
How it works:
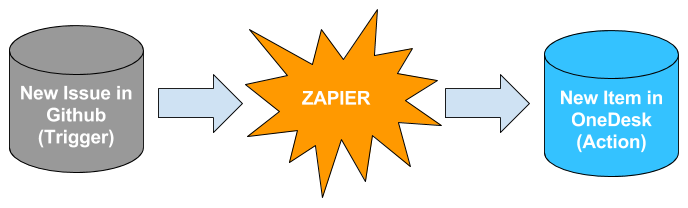
To integrate the platforms we use Zapier to form the link between the two. It allows for actions to be taken in different platforms without the need to do it manually every time.
Basically the formula for Zapier works thusly:
If something happens in platform “A”, make this happen in platform “B”.
The first part is the Trigger and the second one is called the Action.
This allows for a myriad of integrations across a variety of different applications.
We will be integrating our Github account with OneDesk; and we will focus on creating a new Item in OneDesk whenever a new Issue is made in Github.
The benefits of having a helpdesk for your Github
Like we said there are many ways of connecting those two apps together, here are a few scenarios for some useful integrations.
– A new comment on a commit takes place in your Github → update item details in OneDesk.
– A new pull request i made in your Github → create a new helpdesk item in OneDesk.
– A new milestone is made in your Github → create a new container in OneDesk.
Of course, you can do those the other way and have everything sync up just the way you need it. The goal being to make your life easier and minimize manual data input.
So how do you connect it all up?
The process is very simple. Just go on the Zapier site and log in to your account. Then find the “Make a Zap” orange button at the top of the screen.

You will then need to select two applications and the order you want your automation (or Zap, that’s how they call them) to have.
The way to select this is by choosing first a Trigger application, which will be the “whenever this happens” part of the equation, then an Action application.
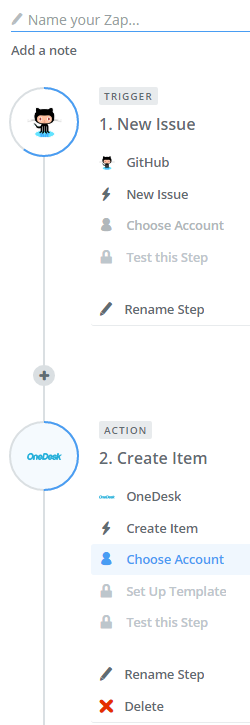
In this case you should pick Github as your Trigger. Once that is done they will prompt you to select a specific trigger (there are many to choose from) and we will select New Issue.
You will then be prompted to connect to your Github and will need to, to validate this particular step. Once all the Github section is full and you have successfully tested that it works, you can go and select OneDesk as the action application. Again same process, pick the action you’d like to see, and for us that is a New Item, and then validate the information you’d like to see transferred and the account details.
Once that is all done simply name your Zap and save it, and click on the “Your Zap is OFF” slider on the top right.
![]()
And there you have it, you have successfully integrated these two platforms and connected a helpdesk to your Github, you can now enjoy just a little less work to do, hooray!
To find more useful integrations like this, check our website out or book a demo with us.
Photo Credit: “Binary Code”/ Christiaan Conen / CC BY