OneDesk includes multiple customer-facing apps that you can use to enable additional support channels and self-service options. You can deploy your customer apps in different ways depending on your preferences. It is recommended to provide your customers with multiple ways of accessing your customer apps.
The apps include the web widget, homepage, messenger, portal, knowledgebase and webforms. The web widget displays as a bubble on your site which allows easy access to the other apps. The homepage is a configurable landing page for your customers. The messenger is a live chat application between your agents and customers. The portal allows customers to view ticket or task progress, status, or other details you allow. The knowledgebase is a hub of information for your customers. And finally, webforms allow customers to submit new tickets or tasks. You can enable all or any of these apps for your customers to use.
The key first step to start serving your customers is to add the apps to your website. Once added, you can adjust various configurations such as appearance, and behavior live and directly in OneDesk, without making additional changes to your site itself.
Table of contents
Using a link to an app
If you want your customers to access one or more apps from your site, a simple method is to simply link the app URL from somewhere on your site. As an example, you can have text in your site menu that says ‘Customer Portal’ which links to the URL of your portal application. Of course you can use this method for any and all apps you wish to use, as each of the customer apps has its own URL.
To find the URL for each of your applications go to Administration > Customer Apps > Customer Apps List > under the column Customer Access URL.
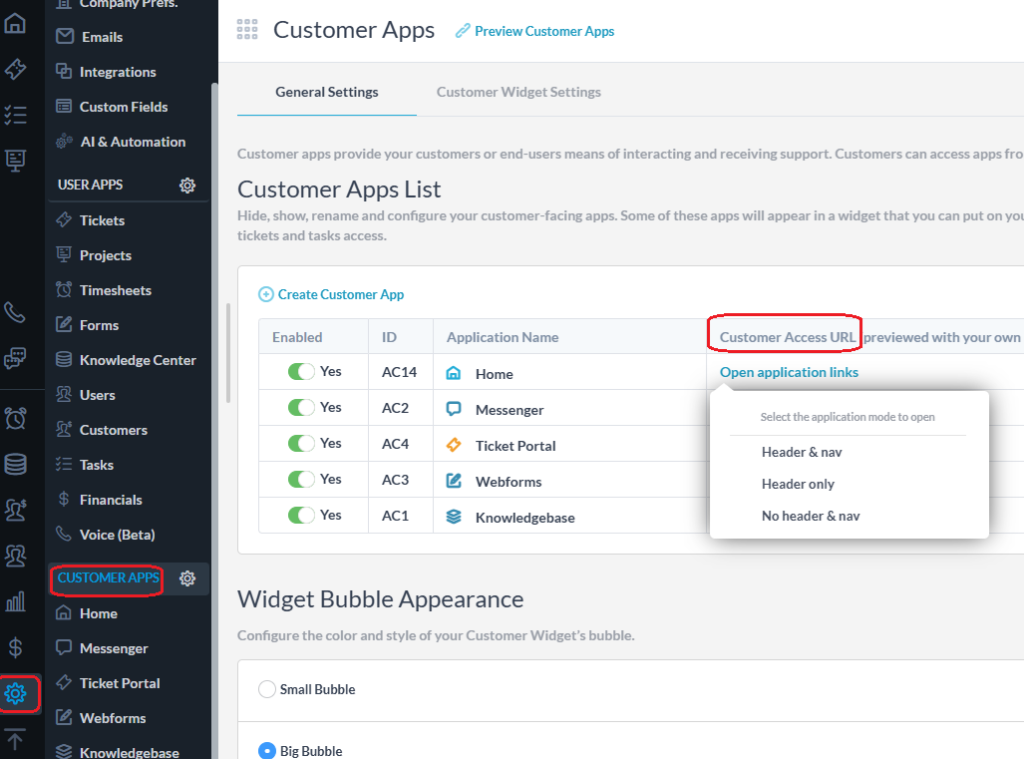
There are three different ‘modes’ that you can choose to link.
Header & Nav – This mode includes the top header and the navigation sidebar. Use this mode if you want to link to the full application with its styled header and access to the navigation bar.
Header Only – This mode includes the top header. Use this mode if you want to link to the app with its styled header but not give access to the navigation bar.
No Header & Nav – This mode includes just the many contents of the app. Use this mode if you want to link to the app without the styled header or access to the navigation bar. .
Embedding the web widget
What is the web widget?
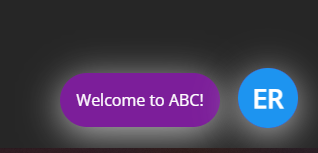
The web widget is an application that can be added to your site and appears as a bubble icon on the side of the page. When that icon is clicked, customers can access any or all the customer apps you have enabled. Each app appears as a tab within the widget. The widget itself can be configured in terms of appearance as well as which apps are included within the widget. For complete information on configuring the widget appearance and behavior see: Widget Configuration.

Adding the web widget to your website with the snippet
The widget is quite simple to add to your website. Simply add a small JavaScript snippet to the code of your webpage. You can find your snippet inside the administration panel of your OneDesk account, under Administration > Customer Apps > Customer Widget Settings. Then click the “Generate Snippet” link.

This action will generate the code to place the widget on your site. Copy and paste the code snippet into your website’s code. Depending on your company, you may need a specific department or team member to do this for you, however, once your website code is accessed, the process is easy. Just add the generated script before the closing ‘body’ tag. If you would like the widget to appear on all pages of your website, we recommend adding the script to your page footer. And that’s it! Your customers can now access any apps in the widget from your website. Once again, you can configure the widget directly from your OneDesk account without making additional changes to your website.
If you use a WordPress or Joomla site however check out the sections below.
Configure the widget bubble from the code snippet (optional)
While you can just copy and paste this snippet as is, there are a few options you can configure in the code if you wish. You can change the position on the page, colors, and icons by using the parameters listed below. If you don’t specify a property it will use the default. Note: Don’t change the org-name since this is what sets it to your own customer portal.
(Again, keep in mind this is entirely optional and many of these configurations can be made directly in your OneDesk admin settings.)
- origin = “ ”
- Changes the position of the widget to the far corner of the window and the direction the widget opens. Valid values include “left” and “right”. (e.g. origin=”left”)
- x = “ ”
- Granularly changes the position of the widget along the x-axis. Valid values include numbers (e.g. x=”100″).
- y = “ ”
- Granularly changes the position of the widget along the y-axis. Valid values include numbers (e.g. y=”100″).
- distance = “ ”
- Granularly changes the position of the widget along the x-axis. Valid values include numbers (e.g. distance=”100″).
- close-color = “ ”
- Changes the color of the ‘close (‘X’) widget icon which displays on the widget while it is open. Valid values include HEX codes, RGB, and browser supported color names. (e.g. close-color=”red”)


- open-color = “ ”
- Changes the main icon color (the color of the widget bubble when it is not open). Valid values include HEX codes, RGB, and color names. (e.g. open-color=”#FF0CB”)
- bubble-mode= “ ”
- Changes the size of the widget bubble. Valid value includes ‘small.’ Large is the default. (e.g. bubble-mode=”small”)
- bubble-online-text= “ ”
- Changes the text displayed within the bubble when you are set to online (displays in large size bubble only) Valid values include letters, numbers, special characters. The bubble expands based on the amount of characters entered. (e.g. bubble-online-text=”How can we help?”)
- bubble-offline-text = “ ”
- Same as above, but is displayed when your chat is set to offline. (e.g. bubble-offline-text=”Offline. Leave a message”)
- bubble-text-color = “ ”
- Changes the text displayed in the widget bubble (large icon only). Valid values include HEX codes, RGB, and color names. (e.g. bubble-text-color=”aqua”)

You can also programmatically set these attributes via params by creating a second script tag that uses the ‘createCommunicatorButton’ command. Contact us for more details on this.

Add the widget using the WordPress plugin
OneDesk has a direct extension for WordPress. The extension allows you to easily embed the widget to your WordPress site. You can install the plugin from your WordPress settings. For complete instructions see: How to Install the Widget on you WordPress Site.
Add the widget using the Joomla plugin
OneDesk has a direct extension for Joomla sites. The extension allows you to embed the widget on your site. Read about the extension on the Joomla site. Or add the widget using the following instructions: Joomla Integration.
Add the widget to a Shopify site
You can add the widget to a Shopify site by adding the code to your theme’s code. Read full instructions on our knowledgebase: Integrate with Shopify.
Add the widget to a Wix site
You can add the web widget to your Wix website. Read full instructions on our knowledgebase: Integrate with Wix.
To configure the apps displayed within the widget
OneDesk is quite flexible and configurable. You can configure which apps appear as tabs within the widget without disabling the app. For example, you could use only the live chat messenger in the widget, while allowing customers to access the portal from a link. This configuration is helpful if: a) You only want to only use certain apps. b) You want an app or certain apps accessed from the widget while another app to be accessed through other means. See Widget Configuration for full instructions.

Embedding the app(s) to your page
Any or all the apps can be embedded directly onto a webpage. Each customer app can be embedded independently or you can embed the widget itself.
Embedding a customer app is a good option for variety of situations such as:
- You want the app(s) embedded onto a page that is your own URL.
- You want the app(s) to appear contained within your own styling or contextual information.
- You want to embed the app on a page that is behind your own login criteria or within your intranet site.

Embed apps using an iFrame
A fairly straightforward way to embed a customer app is to use an iFrame.
What is an iFrame?
An iFrame is HTML markup which allows you to embed one webpage inside of another. You define a rectangular space on your page where you would like the other web-page to appear, and you define the page that should be embedded. This is done using the iFrame HTML tag.

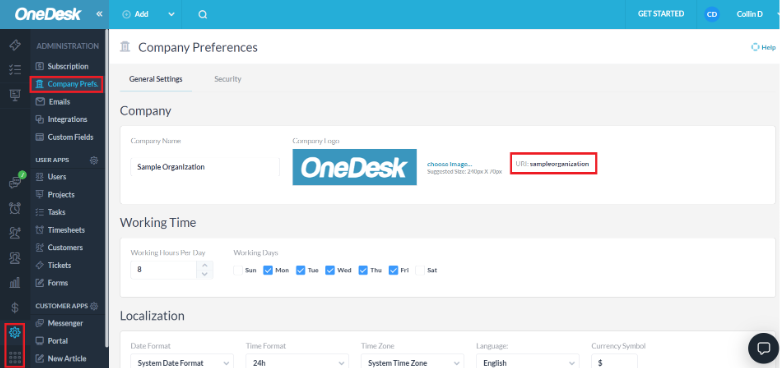
Above is an example iFrame code that will embed the portal. You will need to replace “yourURI” with your own URI so that it embeds your own portal. You can find your URI inside OneDesk at More Applications >> Administration >> Company Preferences. You can also adjust the display size by changing the width and height values.
Below is an example of how you can embed the widget onto your page. Once again, replace “yourURI” with your organization’s URI, and adjust the height and width as needed.

The widget will look something like this once it is embedded on your web page:

Embedding using an iFrame is not limited to the portal or widget of course. You can embed any of the customer apps – portal, KB, webform, messenger. The simplest way is to copy and paste the app URL into the ‘src URL’ of the iFrame code. To find the URL of your apps. Go to Administration >> Customer apps (See the ‘Using a link’ section above).
Using CNAME / Putting the apps on your own domain
What is a CNAME and why would I use it?
When a user opens the OneDesk customer portal from your website they are actually browsing OneDesk.com If you would like to keep the portal under your own domain, you can do so by adding your OneDesk portal page as a CNAME record on your domain registrar. Without getting into the technical details, a CNAME maps a name to a canonical domain name. In other words, this method lets you customize the web address. So when a customer goes to your app, the URL is your own.
How to put apps on your own domain with CNAME
(Available with Enterprise level plans only)
Create a CNAME record
- First you must have access to changing the CNAME records on your registrar. Each registrar is different, but here are some instructions for Domain.com, GoDaddy, and namecheap.
- Next choose a sub-domain where you would like the portal to be hosted. For example, you might choose http://portal.yourdomain.com to host your OneDesk customer portal (“portal” is your sub-domain).
Once this is done, email us (support@onedesk.com) with the following information:
- Your chosen subdomain and redirect URL (eg. http://portal.yourdomain.com)
- The link to the OneDesk customer app you want to put there (This can be found in Administration > Customer Apps > Customer Apps List).
THEN
- We will generate and provide you the 2 CNAME URLs.
- Next, configure the CNAMEs in your domain (create DNS entries). On your registrar create a CNAME record which points your chosen subdomain to the customer app URL. When complete, send us a confirmation.
- We will then perform the changes and activation on our end.
Note: For HTTPS, we can automatically obtain a Let’s Encrypt and/or AWS SSL certificate for your subdomain once the CNAME setting is correctly propagated in the DNS.