Customer Satisfaction surveys are emailed surveys sent out to a customer within 24 hours of their ticket being marked into a finished state. If more than one customer has requested the ticket, the most recent requestor receives the survey email.
These surveys allow your customers to:
- Vote positive or negative on the support they received
- Change their vote within 10 days of the link being provided
- Leave a comment regarding their rating or service
How Customer Surveys Work
Once a ticket is marked into its finished state, a workflow automation in OneDesk sends out an email template to the most recent ticket requester. The template includes a link that allows the customer to rate the level of support they received. This link is available for your customers to use and re-use for the next 10 days.
The link takes them to a new page which allows them to rate their support as “Good, I’m satisfied” or “Bad, I’m unsatisfied”. They can also leave a comment, which is inputted as a new conversation attached to the corresponding ticket. The customer can change their rating and add multiple comments regarding their experience.

Customer Feedback
The rating that the customer gives is applied on the ticket-level. The customer rates the level of support that they received on that ticket and the rating is then attributed to all of the agents who were assigned to the ticket.
When a customer leaves a comment as part of their rating, the comment is received in OneDesk as a new conversation attached to the corresponding ticket. Your customer support agent can then reply back to the comment if any issues need to be resolved or to simply thank the customer for their feedback. Survey comments are marked with a unique tag (##SurveyComment##) to distinguish them from regular customer communication.

Customers are able to change their rating if they wish, but MUST do so within 10 days. The provided customer survey link is available for them to access and allows them to change their rating for 10 days after the link is provided. They are also able to submit multiple comments throughout the 10 days time limit.
Analyzing and Collecting Feedback
Customer feedback can be used to analyze the level of support your team provides to your customers. You can view the data in a few different ways.
View Overall Satisfaction Percentages
Add a Satisfaction Rating column onto your Tree view to allow you to see the total percentage of satisfaction ratings in a folder, a project, or a portfolio to assess customer support on different levels of work.

Create Filtered Views
Create filtered views that allow you to group and organize the data collected to analyze your customer feedback. For example, you can create a filtered view that allows you to assess how individual agents have been rated. You can export these views or schedule to receive reports on how your agents are performing.
How to Change Survey Email
You are able to change the language and wording that is used in your surveys. The content of the email is customizable, however, there is an important dynamic property that needs to be included.
The dynamic property that inputs the link to the survey is: {item.requesterSatisfactionSurveyURL}. This property MUST Be included in the email template so that the customer is provided with the link to submit their feedback.
The base email template is the following:
Email Subject: {ItemType} #{ID} – Tell us about your experience with {orgname}
Body: Hi {requester}
We recently resolved your {itemtype} — and we’d love to hear about your experience. Please give us your opinion of our support, to help us ensure you receive the best support possible.
{itemtype} {ID} – {name}
How do you rate the quality of the support received?
{Good, I am satisfied / Bad, I am unsatisfied}
The {OrgName} Team
To edit the current email template:
Step 1: Click the More Applications icon on the bottom left side of the OneDesk application.

Step 2: Click the cog icon to navigate to the administration section.

Step 3: Click on Emails.

Step 4: Under ‘Email Templates’, click the pencil icon next to the survey template to edit the contents.

Step 5: Make the changes you require while keeping the critical dynamic property: {item.requesterSatisfactionSurveyURL}.
Step 6: Click Save.
E04 is the ID of the default email template which sends your survey. (If you created a different email template to send the survey it will have a seperate unique ID). Select the pencil icon on the right side. You can now edit the email template to your liking. Do not remove the dynamic property called “item.requesterSatisfactionSurveyURL”. This dynamic property will populate the link to the survey. However you can also add this or other dynamic properties from the Property dropdown menu.
You can edit the survey text to fit your company style or language. To edit the survey, go to Admin > Emails > Appearance. Enter your desired text into the fields under Satisfaction Survey.
How to Activate Other Surveys
Customer satisfaction surveys can be activated based on your rules and needs. By changing the automation, you can change when the surveys are triggered. You can set surveys to be sent only on tickets with five-star priority or activate them for tasks instead.
As an example, this is how you can change the survey trigger from tickets to tasks:
Step 1: Click the More Applications icon on the bottom left side of the OneDesk application.
Step 2: Click the cog icon to navigate to the administration section.
Step 3: Click on the item application for the item you would like to create an automated survey for: Tickets, Tasks, or Features.
Step 4: In the appropriate item application, scroll to the Workflow Automations section.
Step 5: If the customer survey workflow automation already exists from OneDesk out of the box, it will be called “When status state is finished, send Customer Satisfaction survey.”. Click the pencil icon under ‘Actions’ to edit the automation.
Step 6: Change the item to the item type you would like the surveys to be activated for.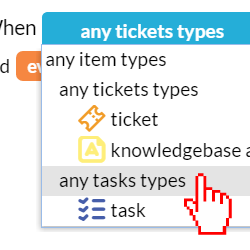
Note: If the customer survey and the automation do not exist, follow the steps in this article to create them: https://onedesk.com/how-to-activate-customer-satisfaction-surveys/