Updated Feb 2023
In this blog post I want to go over OneDesk’s Workflow Automation tool. I’ll start by describing what it is, what it does, and how it works. Then I will give some examples of some of the things you can accomplish with it.
What is the “Workflow Automation” feature?
The workflow automation tool is a feature built into OneDesk. You can think of it as a rules engine that will automatically perform specific actions for you when some conditions are met. You can use it to make your life easier by automating actions in OneDesk that you would have to do manually otherwise. You can also use it as the “logic engine” part of your workflow to move items between statuses, assignments and more.
At this time, this feature is available for Tickets, Tasks, Features, Timesheets, and Projects. In other words the automation can take action on any of these work items. You can find all automations and create new ones by going to Administration -> Automation Center.
Access your automations
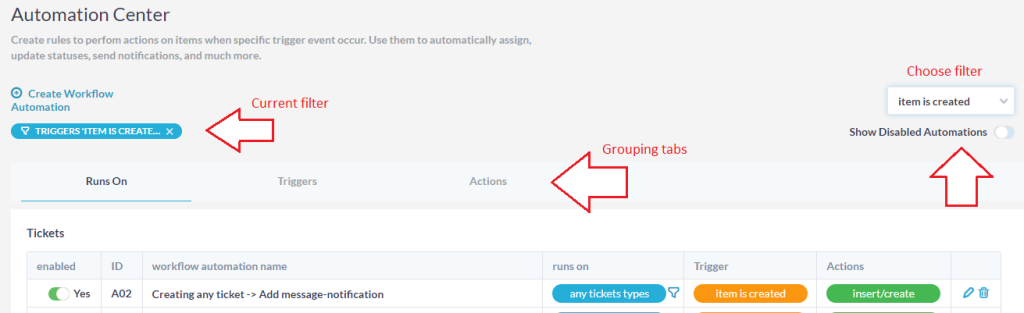
All automation rules are found in the automation center. The automation center is accessible to admin-level users. It is found in Administration –> Automations. Or from the top bar under Tools –> Automation Center.
Disabled automations – Automations can be turned off without being deleted. These automations do not run until they are enabled. Disabled automations are hidden from the automation center by default. To show all automations, toggle on ‘Show disabled automations’.
Locating automations – Select the tabs to see all automations grouped by what the rule runs on, is triggered by or the action(s) it performs. You can filter to find automations. You will see whether a filter is currently applied in the bubble. Select the X to clear the filter.
Editing automations – Select the pencil icon beside the automation you want to edit the rules of. You can configure the name by hovering the name and select the pencil icon.
Deleting – You can disable or delete automations. Disable will turn off the automation, but can be re-enabled any time. Delete will permanently delete the automation. If you change your mind, you will need to re-create the rule.
How do automations work?
Automations are made of three parts:
- What the automation runs on.
- What it the automation is triggered by.
- What actions(s) the automation performs.
- Runs on – Defines the item on which the action(s) will be performed. Automations can run on: Tickets, tasks, features, projects, timesheets. You can further define the ‘runs on’ to include only certain item types, or by adding one or more filters.
- Triggers – Defines the event which will trigger the action to perform. Triggers will vary depending on what your are running the automation on.
- Action(s) – Defines one or more actions which will be taken upon the item. Actions will vary depenfing on what you are running the automation on.
Create a new automation
Administration –> Automations. Or the top bar under Tools –> Automation Center.
- Select ‘Create workflow automation’
- Select what you want the automation to run on.
- The creation window will open.
- You can further define what the automation will run on by adding one or more filters. For example if you add the filter ‘assignee is’ the automation will only run on items where the specificed individual is assigned.
- Select the trigger condition which will run the automation.
- Select one or more actions which will be taken on the selected item. (Note: there is not a guarantee on the order in which automation actions occur.)
What can I do with workflow automations?
There are hundreds of cases you could think up that would be useful applications of the workflow automation engine. In fact new OneDesk accounts ship with a bunch of automation rules that you may want to review, disable, modify or delete. However here are a couple of useful examples, to get your imagination going:
Remind assignees of upcoming tasks.
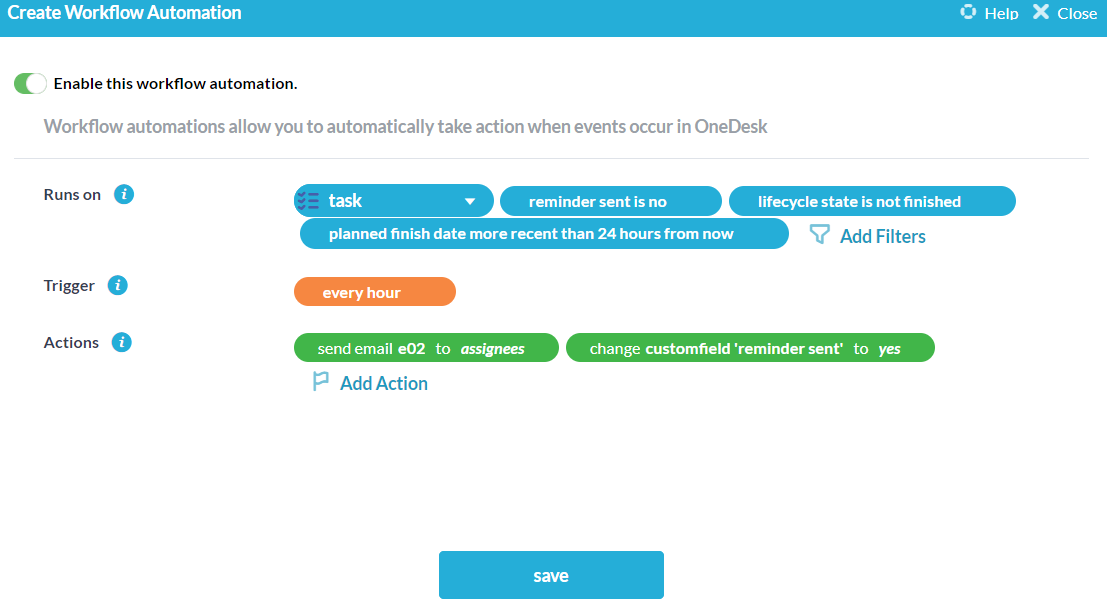
This automation reminds assignees of unfinished tasks that are supposed to be completed earlier than 24h from now.
- BLUE TAGS: The filters are for tasks, that are in the “not finished” state, have the custom field “reminder sent” to no, and that have a planned finish date earlier (less than) the next 24h.
- ORANGE TAG: The trigger is “every hour” which means this rule will run every hour to check if any new items now match these filters.
- GREEN TAGS: The actions send an email reminder to the assignees on the task and set the “reminder sent” custom field to yes
Note: We use the custom field “reminder sent” to make sure that the assignee is not send a new reminder every hour. We therefore had to first create this custom field on tickets. We used a choice custom field and we made this field invisible so as to not clutter our ticket details panel.
Close inactive customer tickets.
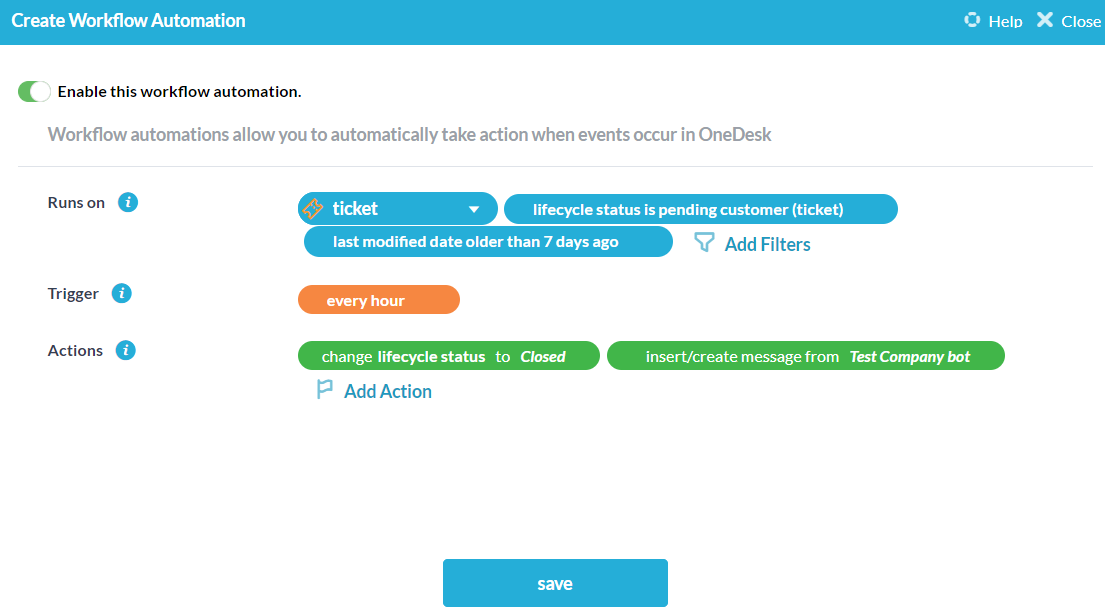
This automation rule closes tickets where you have been waiting for a response from the customer for 7 days, and notifies the customer.
- BLUE TAGS: The filters are for tickets where the status is “pending customer” and that hasn’t been modified since before than 7 days ago.
- ORANGE TAG: The trigger is “every hour” which means this rule will run every hour.
- GREEN TAGS: The actions change the status to “closed” and post a discussion from the bot saying that it has been closed.
Note: This automation works because we have a different automation (on by default) that changes the status to “pending customer” when you respond to them. If the customer responds afterwards this this will put the ticket back into the “pending agent” status.
Deleting/disabling unused automations
Unused workflow automations can be disabled to prevent them from running, or deleted entirely. To disable an automation, switch off the toggle button under the “enabled” column.
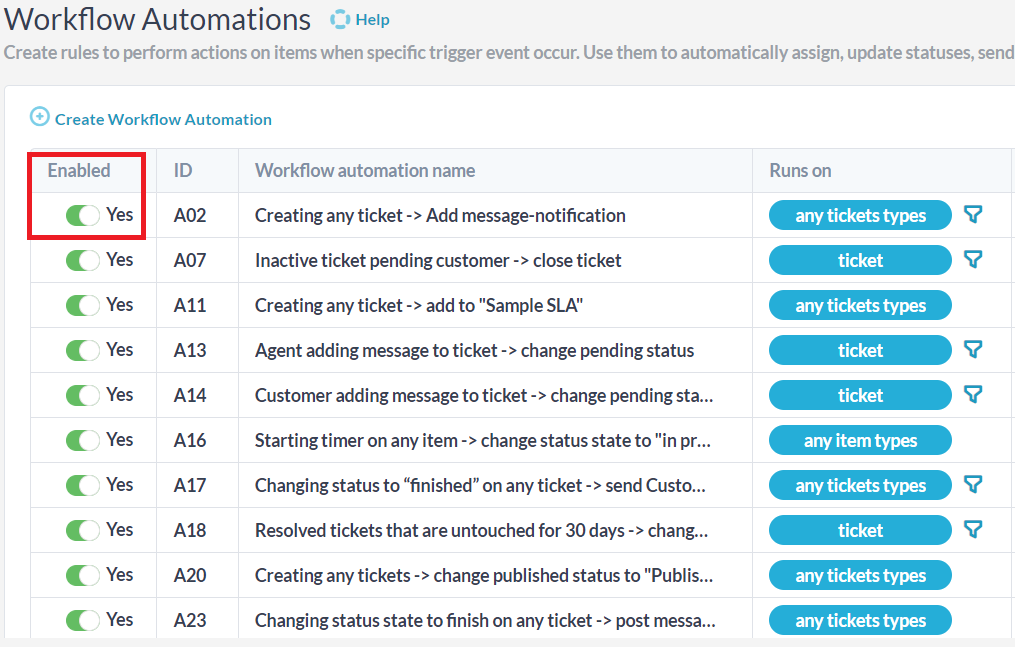
The automation will now no longer run and will be removed from your view. If you wish to see your disabled automations, flip the switch at the top of the automation center which says “show disabled automations”.

If you wish to delete an automation entirely, you can select the trash can icon on the right-hand side of the automation menu. A menu will pop up to confirm you wish to get rid of the automation permanently. If you select yes, the automation will be deleted from OneDesk and will have to be remade if you want to use it again.
