Aside from your system (base) layouts, custom views allow you to display your data in unique, dynamic ways. Custom views are available in all the main OneDesk sections: tickets, tasks, projects, timesheets, customers, users, and analytics. You can easily view what you want in the way you want. You are also able to share your favourite views with others on your team.
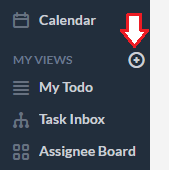
To start creating custom views, click the My Views icon.
How do custom views work?
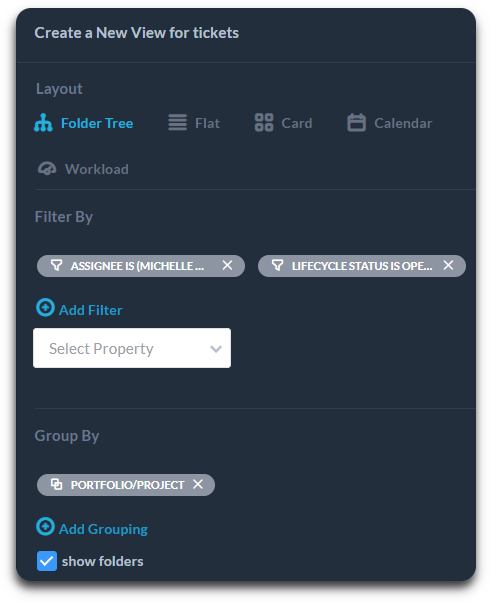
Views consists of the following options: Layouts, Filters, and Groupings:
- Layout: set how your data is displayed (Tree, Flat, Card, Calendar, Gantt, Workload)
Think of the layout as the base of your view. Tree is a hierarchical view, where you can choose the grouping level. Flat is a list view. The card is a Kanban style view. Gantt allows you to plan tasks on a timeline. The Calendar lets you schedule tasks. The workload view is an resource management view. So when creating your custom view, first consider how you want to view your data.
- Filters: define the data that will appear in the view based on the conditions set.
Filters narrow what you are view to the properties you choose. For example you choose to only display tickets assigned to a specific user, or created by a certain customer.
Grouping: define how data is grouped in the view (when applicable).
Groupings create a hierarchy of the data. Groupings are not available in certain layout such as Flat.
Configure custom views even further
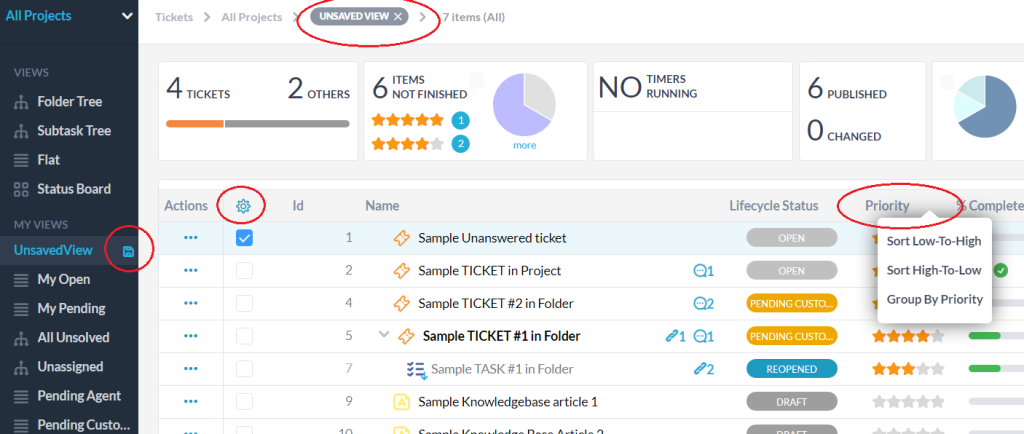
One top of the above options, other applied view settings can also be maintained whenever you create a new custom view. For instance, if the column order has been rearranged, the column visibility has been changed, and/or if any search terms are currently applied, these will also be saved within a custom view.
Click the cogwheel in your view to add or remove columns. Hover and drag the column headers to readjust the column size. Sort a column by hovering and selecting the arrow beside the column name. You will notice that when you do any of these actions, that you will be in an ‘Unsaved View’. You are then able to save these changes to an existing view or save a new view.
Best way to see…
My to-do list (by due date)
To show a list of tasks or tickets you need to complete, sorted by due date:
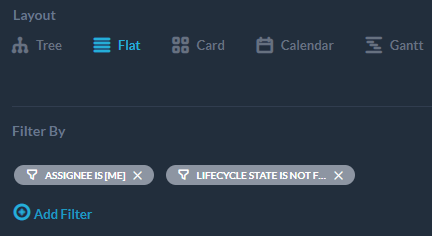
Choose Flat layout.
Select Add Filter > Assignee > Is > Me
Add a second filter > Lifecycle State > is not > Finished
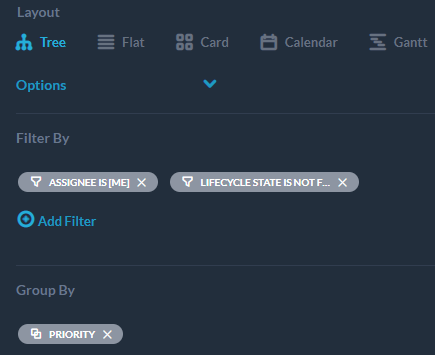
My to-do list (by priority)
To show a list of tasks or tickets you need to complete sorted by importance:
Select Tree layout
Select Add Filter > Assignee > Is > Me
Add a second filter > Lifecycle State > is not > Finished
Select Group By > Priority for a hierarchical view.
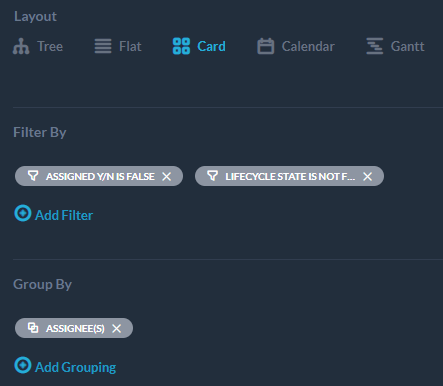
Unassigned tasks/tickets
To display all items which have not been assigned to a user:
Add Filter Assigned y/n > is > No
Select Lifecycle State > is not > finished
To easily assign or reassign these tasks create your view using: Card layout and Group By > By Assignee.
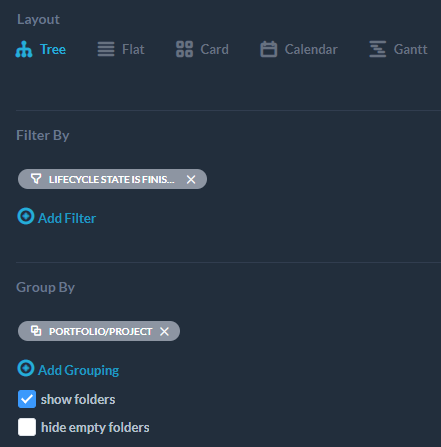
Closed/resolved tasks/tickets
To display all finished items:
Select Tree layout for a hierarchical view.
Select filter Lifecycle state > is > Finished
Select Grouping by > Project
Alternatively:
To display items closed within the last month, select the additional filter option: Creation date > more recent than > 30 days ago
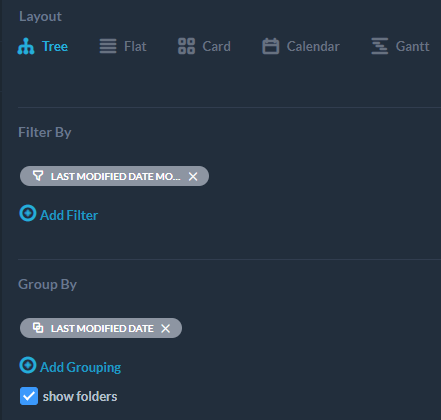
Most recently modified tasks/tickets
To display items most recently updated, for example, in the past week:
Select Tree layout
Select Last modified date > More recent than > 7 days ago
Add Group by > Last Modified Date
Alternatively, to display newest tickets:
Creation date > more recent than > 24 hours ago
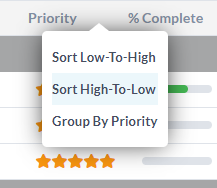
All unfinished tickets/tasks by priority
To show all tickets that are not closed, sorted by highest priority:
Select Flat Layout
Add filter Lifecycle state > is not > finished
Click on Sort High-To-Low priority under the Priority column.
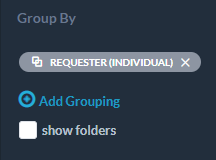
All tickets grouped by customer (company or individual)
To show all all tickets grouped by a customer organization or individual customer:
Select Tree Layout
Select Group by > Requester (Organization) or Requester (individual)
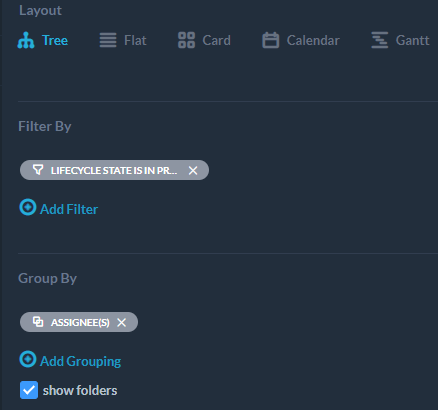
What users are working on
In Tickets or Tasks, select Tree layout.
Add filter Lifecycle state > is > In progress
In addition, Group by > Assignee or Assignee Team
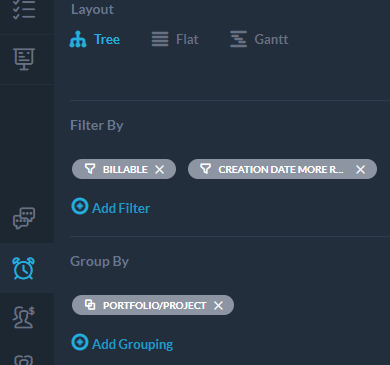
Billable time in the last month
Go to the Timesheets app
Select Tree view
Add filter Billing type > is > billable
Add another filter Creation date > more recent than > 30 days ago
Additional useful filters to narrow further:
To only see billable time from a specific client:
Add additional filter Requester(Organization) > is > ‘exampleorg.com’
To group billable time together according to projects:
Add Group By > Project
Summary
In short, select one of the default layouts to begin organizing your data. Add one or several filters to show only the data you want. You can then use grouping to further arrange data into relevant categories. Save your custom views when you are finished. And don’t forget that you are also able to add/remove data points (columns), reorder columns, or optionally share your favourite views with your team.
There are many powerful custom views you can create in OneDesk. We encourage you to see what works for you. If you need help on how to create a custom view, reach out to our support team!