Receive emails as tickets from one or multiple inboxes, so multiple agents can respond to customers from a central application collaboratively.
Table of Contents
- The email flow: overview
- Create tickets from email:
- Outgoing email channels
- Using incoming channels/queues for routing and organization
- Preventing email loops
How the email flow works
In short, the email flow works as follows:
Connect or auto-forward your support inbox to OneDesk. Your customers can send an email to your support email address. When that happens, a ticket is created in OneDesk automatically with all the information captured. The subject line of the email is the title of the ticket. The body of the email is the ticket description. Attachments are included. And the customer’s name and email is saved and linked to the ticket. You can respond to the customer directly in OneDesk and those responses are sent to your customer’s inbox. Likewise, your customer can send responses from their own inbox and these responses come into your OneDesk account.
There are two methods you can use start receiving emails into OneDesk from your inbox:
- With direct connection from an Office 365 or Google account
- With auto-forwarding email to OneDesk from any email provider.
How to create tickets from email
If you use Office 365:
Option 1: Connect your O365 support email directly via OAuth (recommended)
If the email provider for your support inbox is O365 you can choose to directly connect to OneDesk via OAuth. Connecting with this method will set-up both the incoming and outgoing channels, allow you to quickly receive emails as tickets in OneDesk, and respond from OneDesk using the same email account.
For O365 OAuth is the recommended method as it is the simplest to configure.
Note: OAuth connection only works with Office 365 accounts. See below for using Outlook or another provider.
To connect an O365 account via OAuth:
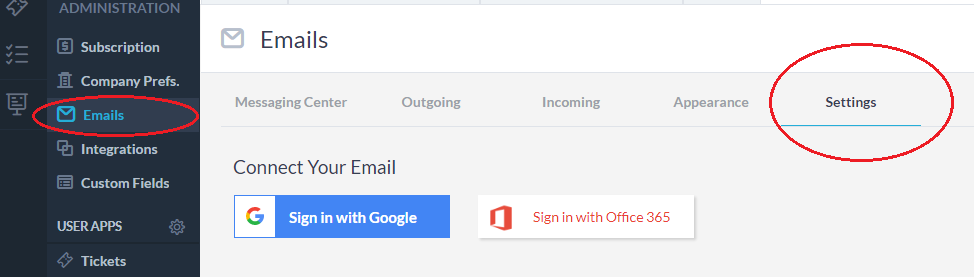
- Go to Admin -> Emails -> Settings
- Click Sign in with Office 365
- Be sure that SMTP AUTH is enabled in your inbox. See instructions.
- Sign into your O365 support email account. Note: Do not use your user/personal email here. You should connect a support/company address, e.g. support@mycompany.
You’re incoming and outgoing channels will now be configured and you can start managing your ticket flow.
Option 2: Set-up an auto forward rule from O365/Outlook to OneDesk
You can set-up auto forwarding from your Outlook or O365 account to a OneDesk creation email. You set-up the auto-forward rule in your O365/Outlook account, and once done, emails are automatically received as tickets in OneDesk.
Use auto-forwarding if you cannot or do not want to connect via OAuth.
See: Auto forwarding using Outlook/O365 for full walkthrough.
(Outgoing emails will be, by default sent via OneDesk’s servers, but you can set-up a custom SMTP or other outgoing account in your outgoing email settings. Be sure to also add your support inbox to the ‘Filter Outgoing Email’ list found in your email settings, or an email loop will occur. See details below).
If you use Gmail / Google Workspace:
Option 1: Connect directly from Gmail using an App Password (recommended)
If the email provider for your support inbox is Gmail/Workspace account you can choose to directly connect to OneDesk via a Google App Password. Connecting with this method will set-up both the incoming and outgoing channels, allowing you to quickly receive emails as tickets in OneDesk and reply in OneDesk via the same account.
For Gmail users this is the recommended method as it is easiest to set-up.
To connect an Gmail/Workspace account via App Password:
- Go to Admin -> Emails -> Settings
- Click Sign in with Gmail
- Create a Gmail App Password in your support account. Note: You must have 2FA turned on in your support account to use an App Password. See Create Gmail App Password for detailed instructions/information on creating an App Password.
- Enter your support address and the App Password into the window. Note: Do not use your user/personal email here. You should connect a support/company address, e.g. support@mycompany.
You’re incoming and outgoing channels should now be configured and you can start managing your ticket flow.
Option 2: Set-up an auto-forward rule from Gmail to OneDesk
You can set-up auto-forwarding from your support’s Gmail/Workspace account to a OneDesk creation email. You set-up the auto-forward rule in your Google support account, and once done, emails are automatically received as tickets in OneDesk.
Use this method if you do not want to, or cannot connect your support inbox via the App Password method.
See: Auto forwarding using Gmail for full walkthrough.
(Outgoing emails will be, by default sent via OneDesk’s servers, but you can set-up a custom SMTP or other outgoing account in your outgoing email settings. Be sure to also add your support inbox to the ‘Filter Outgoing Email’ list found in your email settings, or an email loop will occur. See details below).
If you use another email provider:
Auto forwarding from your support email’s provider
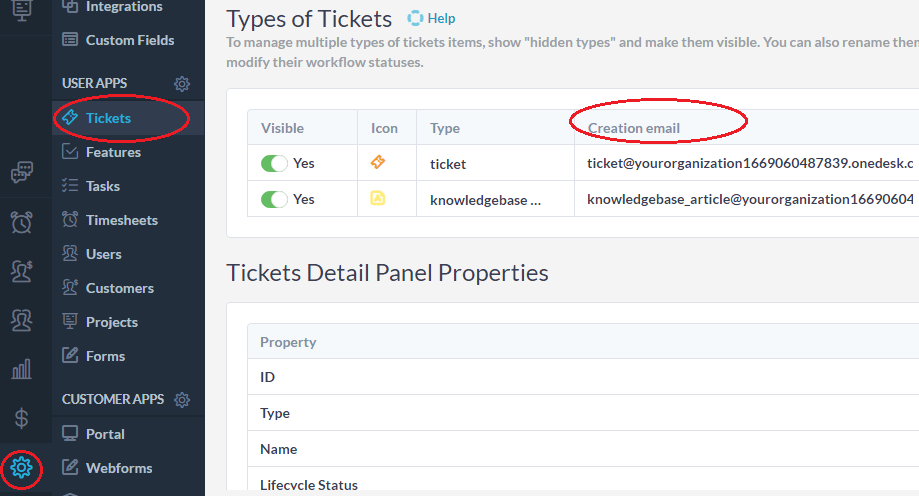
If you do not use Google or O365 you can create tickets in your OneDesk account from your support inbox using the auto forwarding method. Simply create an auto forward rule in your support email account to a OneDesk creation email. Your creation email is found in Administration -> Tickets -> under the Creation email column. Once the rule is set-up from your support account, emails are automatically received as tickets in OneDesk.
Consult your email provider if you need instructions on how to auto-forward. Here are some instructions from common providers.
(Outgoing emails will be, by default sent via OneDesk’s servers, but you can set-up a custom SMTP or other outgoing account in your outgoing email settings. Be sure to also add your support inbox to the ‘Filter Outgoing Email’ list found in your email settings, or an email loop will occur. See details below).
Outgoing Emails
What email do customers see in their inbox?
If you are connected directly via Google or O365 your outgoing email will be connected at the same time. Therefore, outgoing emails will be sent from the same channel. Customers will see your own O365/Google address.
If your incoming channel is via auto forwarding, the default outgoing server will be OneDesk’s email servers. Customers will see the ‘From’ address as configured in Admin -> Emails -> Settings -> Outgoing Email Servers. (We recommend putting your support inbox address here. It may have been added already if you set-up via the ‘Get Started Wizard’).
Whether you use direct connection or auto forwarding you can add additional outgoing channels and configure from which outgoing channel your emails are sent.
(To configure background colors, signature, etc., see: Email Appearance).
Connecting additional outgoing channels
You can link multiple outgoing channels. You can use:
- OneDesk’s email servers
- An Office 365 account via OAuth
- A Gmail/Workspace account via App Password
- A custom SMTP server
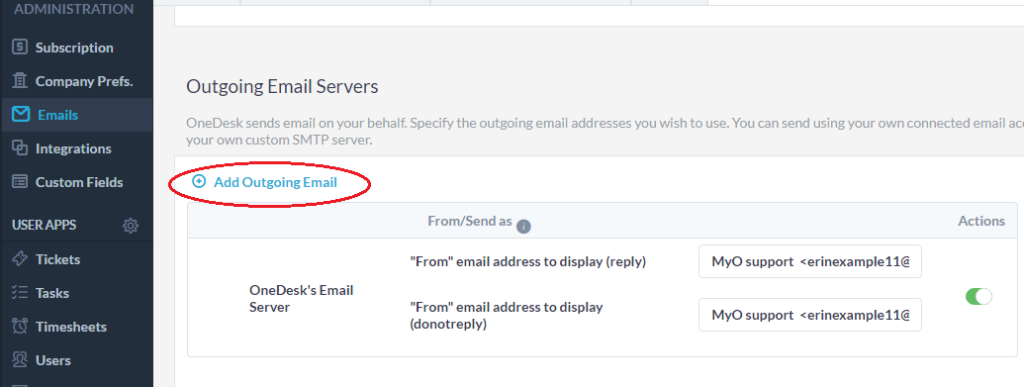
Add an additional outgoing channel by going to: Administration -> Emails -> Settings -> Add Outgoing Email
Connecting a O365 or Google account works the same as adding an incoming channel. Connect via OAuth (O365) or with an App Password (Google), see the above guide under adding incoming channels for tips.
To connect a custom SMTP see the guide: Add Custom Outgoing SMTP
Choosing which outgoing email channel sends emails
When you have more than one outgoing channel connected you can choose which one to use. Each incoming channel can be mapped to a connected outgoing channel.
Go to Administration -> Emails -> Settings -> Incoming Email / Queues
Under the ‘Reply Via’ column you can map an incoming channel channel to an outgoing channel using the dropdown. When an agent sends a reply from a ticket created from the incoming channel, it will use the chosen outgoing channel to respond.
For example, a customer emails support@xyz.com. This creates a ticket using the support@xyz.com channel. If the outgoing mapping is configured to be a different address, for example, IT@abc.com, the customer will receive a response to their ticket from IT@abc.com, despite having emailed support@xyz.com. This is an uncommon configuration and most companies will probably prefer to use the same outgoing channel as their incoming channel.
Using email queues
You may have noticed in your your incoming channels / queues the ability to give them a name and color. This feature is because you are able to utilize email queues to track, monitor, and auto-route your tickets.
See: Email Queues for full details
Prevent email loops
An email loop is an issue that can occur when a notification is sent to your support email, resulting in ticket creation. That ticket then creates a new notification, and this loop continues. To avoid this issue be sure to add your support inbox to the ‘Filter Outgoing Email’ block list, found in Administration -> Emails -> Settings. (If you went through the ‘Get Started Wizard’ or you connected using the Gmail/O365 direct connection, your support email address should be added to this list automatically).
For more information on email loops, or if an email loop is occurring in your account see the article: Preventing Email Loops.