At OneDesk we believe the tool you use should adapt to you. Whatever your workflows and processes, you can customize your account to work the way you work. One powerful function in OneDesk is our highly flexible email-to-ticket creation and auto-routing capabilities. This article will give you insight into how email forwarding to create tickets works and how best to route tickets to the right place.
In OneDesk you can set up auto forwarding from your organization’s email(s) to your OneDesk account to automatically create tickets. (Quick Setup Guide)
Auto-Forwarding Email Addresses
In OneDesk, ‘Email Queues’ refer to the stream of incoming, auto-forwarded emails from an email address. As such, each email address you have set up to auto forward to your OneDesk has its own ‘Email Queue.’

View Your Email Queues
Go to Administration > Emails > Settings > Incoming Email /Queues > Auto Forwarded Queues. This section provides a list of all emails you have received an auto forwarded email from.
Note: If you disable forwarding from a given email, the email will still appear in your forwarded queues list. However, the email will remain unused and will otherwise not affect your account or workflows. You can choose to delete it by clicking the x icon. Clicking the x does not stop auto forwarding, it only removes the queue from the list. If auto forwarding is still enabled from your email account, the queue will be recreated with default settings.
Configure Email Queue Name and Color
By default, the Email Queue Name will match the username of the email address, however you can easily change the name to anything you want.
Hover and select the icon next to the queue name. Enter your desired queue name and hit enter to save. For instance, In the above image, my email queue name has been configure to ‘support’.
You can also change the tag colour for each email queue, by clicking the colour swatch. The tag colour is helpful for quickly determining the origin of your tickets, as we will see shortly.
Manual Forwarding
OneDesk detects when an email has been manually forwarded rather than auto forwarded. Manual forwarding from an email to OneDesk will create a ticket as normal. However, the email address you sent the manual forward from will not be captured in your list of Forwarding Email Addresses and is not considered an email queue.
Where did my tickets come from?
With our email queues configured, it is easy to keep track of where your tickets originated and to implement this information into your workflows and automations. Within your tickets portal, click the cog wheel at the top of your columns and turn on the column called ‘Incoming Email Queue’. You can save this view setting (and any other view options you use) by creating a custom view (Custom Views)
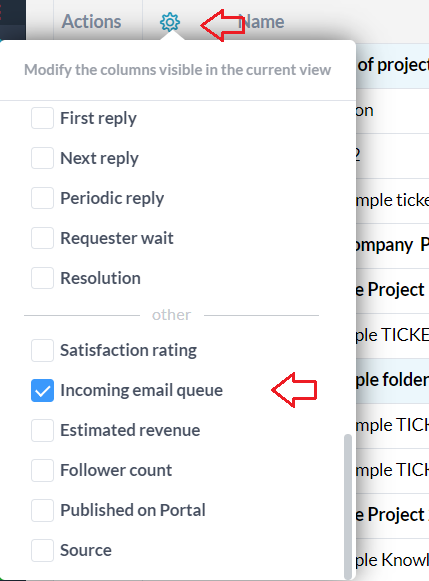
Remember our names and tag colors we configured? Our sources for tickets are clearly labelled beside our tickets.

Now every ticket from my email address labelled ‘SUPPORT’ will be clearly delineated and I can easily establish my workflows. So how do we do that? Let’s set up some automations.
Auto-Routing
In OneDesk it is easy to set-up highly customizable automations to fit your workflow needs and save you time. For example, I might want all my tickets from the ‘Support’ Email Queue routed and assigned to my customer support team. Let’s see how we could set this routing up.
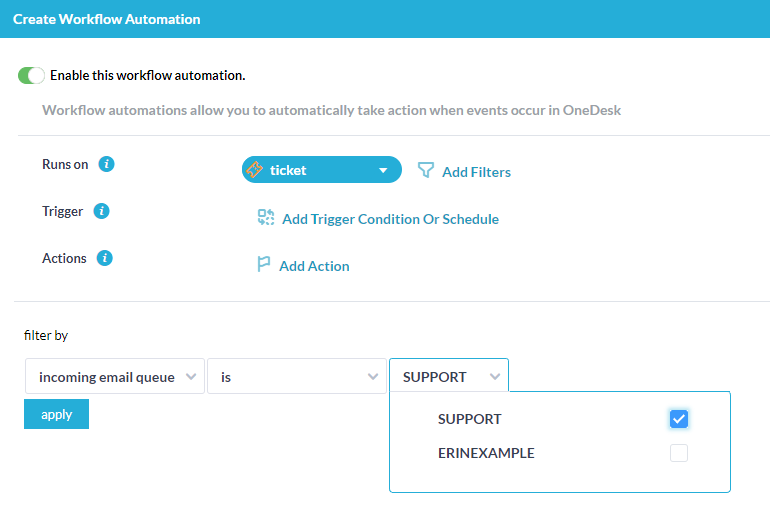
Create Automation
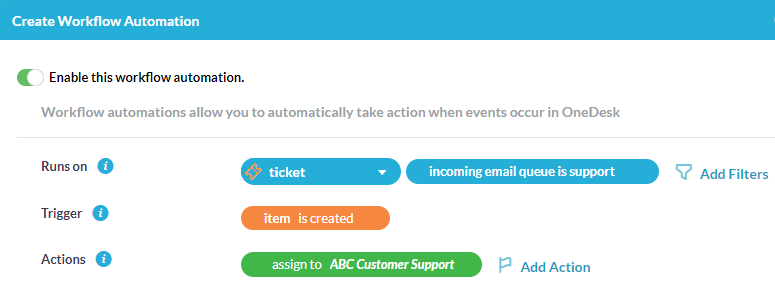
Go to Administration > Tickets > Create Workflow Automation. Start by running the automation on tickets. Next add the filter incoming email queue > is > ‘your queue name’
Add a trigger condition. For example so the automation runs for new tickets, select ‘item is created.’
Finally add the desired action. For example you can assign it to an individual or team. Below, tickets will be assigned to our Customer Support Team.
Ticket routing can also be used to move tickets to projects, send customized auto-replies, and much more.