Help Desk - Basics & Navigation
Help Desk guide contents:
In OneDesk there are users and customers. Users (agents) are members of your team, typically the ones assigned to tickets. Customers (or end-users) can be external or internal to your company but are the people for whom you perform services or answer queries.
Customers can interact via:
- Email – Customers can submit tickets, receive notifications, and reply to updates all from their email. (We will learn more about this later in the guide.)
- Customer-Facing Apps – Customers can interact using the customer-facing applications. These applications include: the homepage, live chat, portal, webforms, and knowledge base. Any or all of these can be deployed. The apps can be accessed from mobile, laptop, or desktop browsers via a link or the web widget which you can embed to your website. (We will learn more about these later.)
- Other tools via integrations – OneDesk integrates with a number of 3rd party applications. Some of these integrations allow customers to interact or submit requests.
Users can access the web or mobile app. This guide will mainly focus on performing work and configuring your account using the web app.
Tip: Users can be grouped together into Teams. Customers are grouped together into Organizations. By default, customers get grouped into Organizations based on their email domain.
Learn more about:
The web app and navigation

Top bar
- Add button – Access your internal form for creating tickets, and other stuff like projects, users, and more.
- Tools – Access helpful tools like macros, import, and more.
- Global Search – Allows you to search through almost anything in your account.
- Get Started – Access the Quick Setup Wizard as well tutorials and articles, including this guide!
- Manage Products – View your OneDesk products or add new ones!
- Profile menu – Access your profile as well as quick links to your notifications settings, assigned tickets, timesheets, and more.

App Sidebar
- Dashboard – Access your user dashboard which includes various centralized widgets and metrics for your messages, tickets, and logged time. Most agents can work almost entirely from this app.
- Tickets App – Access your Tickets app which includes powerful views to work on and analyze tickets.
- Projects App – Access your Projects app, useful for getting a big picture on your tickets as well as organizing projects and portfolios.
- Voice – Access your Voice app to answer and manage calls.
- Messenger – Access your messenger to reply to and manage messages. Messages from email, live chat, and portal are centralized here.
- More Apps – Expands the sidebar to show the other apps: Timesheets, Knowledge Center, Customers, Users, Analytics, Administration.
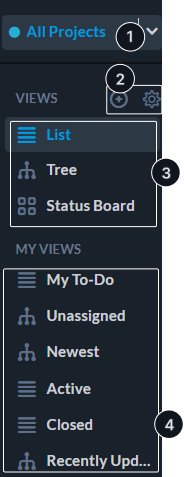
Views panel
Views are the different options for how you see tickets. Filters determine which tickets you see.
- Project Scope – Determines which project’s tickets you see. Unlike filters, scope works ‘on top’ of views. The scope also allows access to archived or not shared projects.
- Create & Manage Views – (shows on hover) Click the ‘Plus’ Icon to create a new custom view. Click the ‘Cog’ Icon to manage your system and custom views, including deleting or re-ordering.
- System Views – These are your ‘base’ views and layouts. When you clear a filter you will be returned to one of these views.
- Custom Views – These are your saved custom views. Custom views take the system views and apply filters, groupings, columns, and/or searches.
Learn More:
What you see in OneDesk
Sharing
Projects must be shared with you in order for them to appear in your workspace (grid, dashboard, etc). If a project is not shared, you will not see it or anything within it. Account admins can easily join projects from the project scope. Non-admins can request to join and be given access. Once something is shared with you, the project and its contents appear in your workspace.
User roles
Users can be admin or non admin. Non-admins do not have access to admin settings and can also have different app permissions. App permissions affect whether you can see an app, or perform certain actions within the app.
Views and filters
OneDesk has several views and dozens of filters that influence what you see.
Learn More: