Workload management involves getting a clear picture of who is available and when, in order to utilize your team’s full capacity and exceed goals. In OneDesk there are multiple ways to manage your team’s workload. You can determine how many tasks are assigned to someone, how much time they have available in a given period, the actual time or progress logged to work, and more.
What is workload management?
Workload management is an essential concept in running effective workplaces. Workload management, in short, refers to efficiently scheduling and distributing work across your team in such a way that time is accurate and optimized. The process is multi-faceted involving:
- Break down projects into tasks – Divide the parts of your project into manageable parts.
- Scoring and prioritizing tasks – Estimate the time needed to complete tasks and which ones are most important.
- Planning and scheduling – Set realistic deadlines and avoid schedule conflicts.
- Forecasting workload and team capacity – Consider your team’s working hours and hours of assigned work.
- Assigning resources – Know your team’s strengths and consider their workload.
Importance of workload management
Workload management is essential for creating work balance and meeting project goals and deadlines. Proper workload management can increase efficiency by utilizing your team’s time and strengths. There are only so many hours in a day and resources are limited. As such, it is important to estimate and plan tasks in order to maximize your team member’s skills and working hours. With workload management tools, you can assign tasks to team members and effectively manage how time is used.
Good workload management can also be great for morale. Distribute work fairly and evenly across your team to avoid burnout and the overall stress of team members. On the same end, it is important to know your employees and distribute work that meets their strengths. Best of all, workload management is a long term solution, as satisfied employees produce higher quality work.
Team workload management in OneDesk
OneDesk is an all-in-one help desk and project management app. OneDesk offers a wide variety of features and tools to better manage your team’s workload.

The workload view
The workload view is a work view available in both your tasks or tickets applications. A workload view is an essential workload management tool. It helps you visualize and understand the availability and overall workload of people in your organization. The workload view shows the amount of work hours assigned to the individual during the selected time period. The assigned work hours are compared with their total capacity (in hours) for that period. For example, above, Michelle is booked for 5 hours on Sept 13th, with three hours left of availability. Under-booked time periods are indicated in green while overbooked are indicated in red.
For detailed information on using the workload view, see: Workload View
The assignee window
The assignee window is the popup window where you assign tasks (or tickets) to a member of your team. The assignee window has a helpful workload view built into it. The assignee window’s workload view allows you to see your user’s availability, assign a task, and set the task’s schedule – all in one place.
Accessing assignee window & assignee workload
- Go to a task detail panel.
- Click the ‘Assign’ button and you will be greeted with the assignee window.
The assignee window has a number of functions including assigning a task to someone, viewing user availability, and scheduling or rescheduling a task.
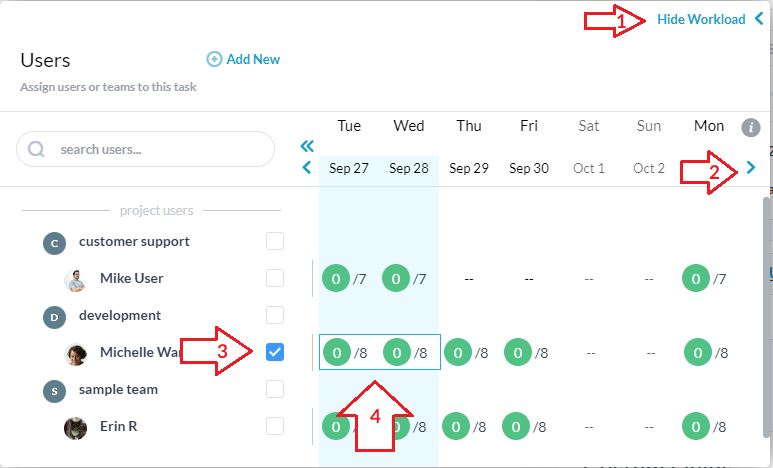
- Click ‘Show Workload’ on the top right of the window to display the workload view. (Click Hide Workload to hide the workload section).
- Click the arrow on the right side, beside the dates, to show the next 7 day period.
- Click the check box beside the user’s name to assign a task. Clicking the checkbox will only assign the user. This action will not schedule or re-schedule the task. In other words, the user will be assigned for whenever the task was previously scheduled. (You can still proceed to schedule/reschedule the task using any of the other scheduling options).
- You can set the schedule for the task and simultaneously assign the task by clicking on the bubble(s). The light blue highlighted column(s) indicate the day(s) the task is scheduled for. Tip: Dates marked in gray are company days off. Company as well as Individual users’ non-working days are indicated by the dashes (–).
Assigning and scheduling tasks from the assignee workload window
Click the workload bubbles, beside the user, to simultaneously assign and schedule the task. First click the bubble under the desired start date then click the bubble under the desired finish date to schedule across multiple days. (If not already assigned, the user will be assigned to the task).
If you click the arrow located on the right side beside the dates you can move to the next week. If you click the start, then click the arrow to the next week you are able to schedule the task across multiple weeks.
To schedule for one day, click the date then click the date again to confirm.
Tip: The schedule and assignment will be changed and saved upon clicking out of the assignee window.
Note: It is NOT possible for two users to be assigned the same task on different days. In other words, two users CAN be assigned to the same task however the schedule date(s) for the task must be the same for both users.
Both of these workload views are important tools for workload management, allowing you to intelligently assign tasks and forecast workload or schedule conflicts.
Workload management with the Gantt chart
The OneDesk Gantt chart is a helpful tool to schedule tasks, create dependencies and follow the progress of work. A helpful option when using the Gantt chant for workload management is to group or filter your chart in order to see user or team tasks. The default Gantt view is grouped by project, but you can create your own customized Gantt chart and save it for use anytime.
Gantt chart grouped by user or team
Create a new saved view, by clicking the icon beside ‘My Views’ on the side panel of your tasks application. Select Gantt chart from the layouts. Select Group By → Assignee (for users) or Assignee Team.

On the blue bar directly beside the user’s name you will see that the bar gets darker or lighter blue depending on how many tasks are scheduled at that time. If it is white the user has nothing scheduled at that time. If it is dark blue, the user has many tasks scheduled at that time. To get a better understanding of workload you can also use filters on the Gantt. Try filtering by lifecycle status to see only in progress tasks, or filter by a requester (organization) to see the tasks designated to a customer organization.
Green bars on the Gantt chart indicate the ‘actual’ work taken on a task, as generated by timesheets.. Employees can log time on tasks using timesheets as well as timers in OneDesk. By comparing the ‘planned’ progress to the ‘actual’ progress, managers can determine whether work is on-track and manage resources accordingly.
More details on custom views: Creating Custom Views
More details on timesheets: Creating Multiple Timesheets at Once
The shared calendar
The calendar is located in your tasks application and (by default) displays all scheduled tasks. Like other views, you can narrow the view to a certain project, filter to a certain team or user, and more. The calendar view can be a helpful tool to see your team’s schedule and tasks for a given time period. You can also create and schedule new tasks on the calendar. Like the Gantt chart you can utilize timesheets to log the ‘actual’ time taken on tasks and this progress is indicated in green on the calendar.

The user calendar
The user calendar is located on each user’s profile. The user’s calendar shows the individual’s working hours, regular time off, and vacation or absence events. You can also see the tasks assigned specifically to that user and the actual work logged on those tasks. From the user calendar you are also able to set individual work hours or create new vacation events. The user calendar is essential for setting a user’s ‘capacity’ (how much work they can do in a given period). The user calendar is also a good avenue for the workload management of an individual team member.

Chart widget
The chart widget is a series of small charts at the top of your tickets and tasks applications. The chart widget provides an overview of ticket or task progress, workload, priority levels, and more. You can click many of the chart components in order to filter your view to the property. The chart widget is helpful for on-the-fly workload management. You can visually keep track if a team member is overloaded with tasks or how tasks are progressing over time.
Tip: The chart widget corresponds to your view level. In other words, if you apply a filter or narrow to a specific project, your charts will reflect the information you are currently viewing.

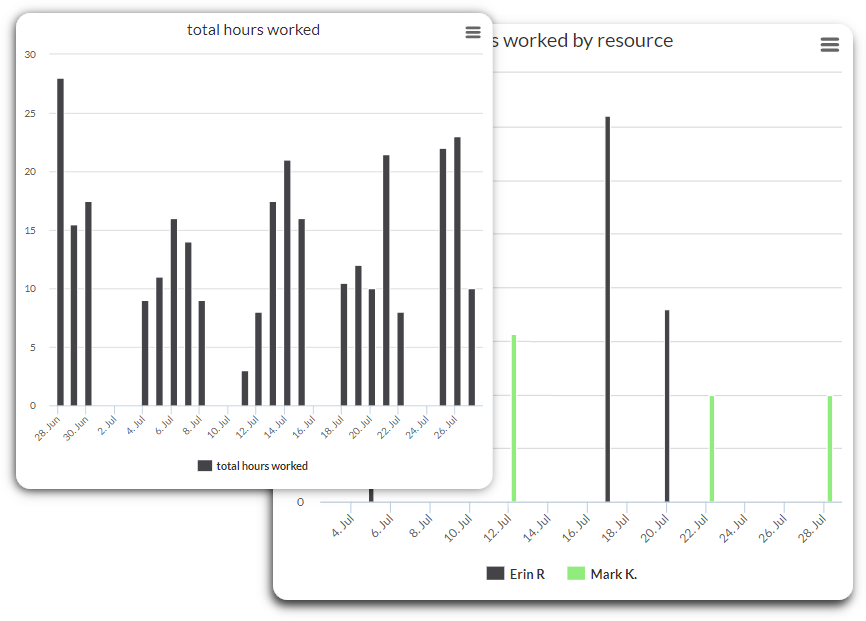
Charts & analytics for workload management
The analytics app is located on the far left side bar of your OneDesk app. Here there are a variety of charts and graphs that give insights into project burndown, velocity, workload, unsolved tickets/tasks, and more. Explore charts in the ‘chart series’ drop down. Newer accounts will have a bootstrapped dashboard called ‘Team Workload.’ You can create your own dashboard of the charts you like, or edit the existing dashboards.