OneDesk’s customer success surveys allow you to assess your customer support team’s level of support. These surveys are sent out by email to the customer once a ticket has been closed. The customer can then rate the service as negative or positive and leave a comment about their experience.
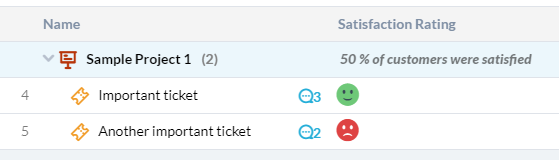
You will be able to activate customer satisfaction surveys on an item-level. That means for every item type you have enabled, you can create an automation that sends out an email survey for your customers to review the support they received. All users who were assigned to provide support on that item will receive the given rating.
Note: If you have been an existing OneDesk user as of April 25th, you will have to activate the survey manually. Please see the steps below. New users of OneDesk who sign up on April 26th and later will have surveys automatically activated.
How to Activate Surveys for All Tickets
There are three parts to activating surveys on tickets.
PART 1: Create a Custom Field
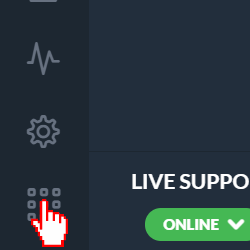
Step 1: Click the More Applications icon on the bottom left side of the OneDesk application.
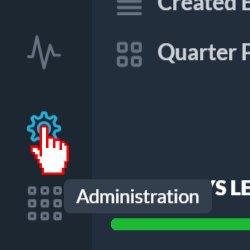
Step 2: Click the cog icon to navigate to the administration section.
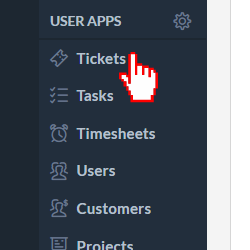
Step 3: Click Tickets.
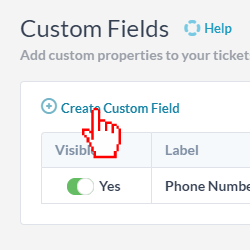
Step 4: Under ‘Custom Fields’, click Create Custom Field.
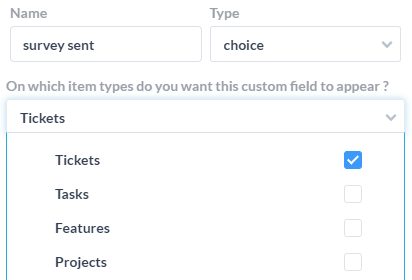
Step 5: In the ‘Name’ field, type ‘survey sent’.
Step 6: From the ‘Type’ dropdown, select choice.
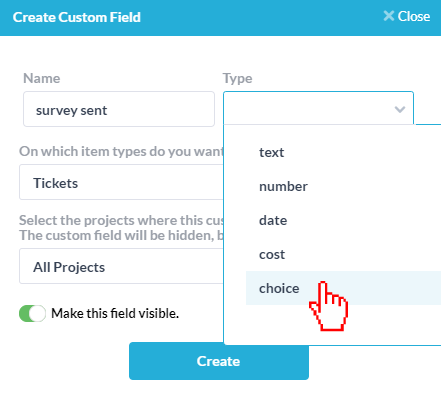
Step 7: Select Tickets from the drop-down.
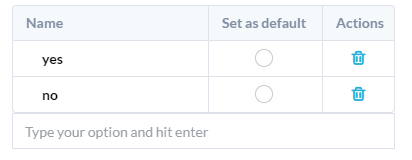
Step 8: In the table, click on the text field that says ‘type your option and hit enter’. Type ‘yes’ and hit enter. Type ‘no’ and hit enter.
Step 9: Click Create.
PART 2: Create an Email Template
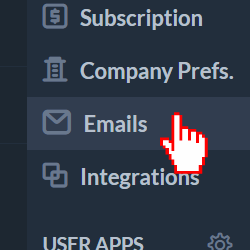
Step 1: Click the More Applications icon on the bottom left side of the OneDesk application.
Step 2: Click the cog icon to navigate to the administration section.
Step 3: Click Emails.
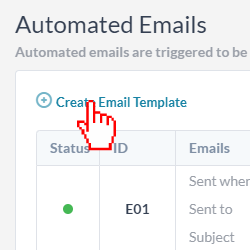
Step 4: Under ‘Automated Emails’, click Create Email Template.
Step 5: Enter the following:
Email Subject: ${item.type} #{ID} – Tell us about your experience with {orgname}
Body: Hi ${item.recentRequester}
We recently resolved your ${item.type} — and we’d love to hear about your experience. Please give us your opinion of our support, to help us ensure you receive the best support possible.
${item.type} ${item.id} – ${item.name}
How do you rate the quality of the support received?
${item.requesterSatisfactionSurveyURL}
The ${item.organizationName} Team
Note: You can change the template, but ensure you keep the {Good, I am satisfied / Bad, I am unsatisfied}, which contains the survey block.
Step 6: Click Create.
PART 3: Create the Automation
Step 1: Click Tickets.
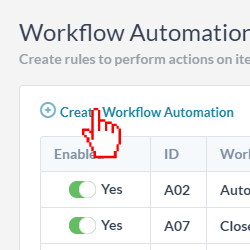
Step 2: Under ‘Workflow Automations’, click Create Workflow Automation.
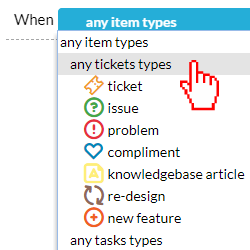
Step 3: Click any item types and select any tickets type.
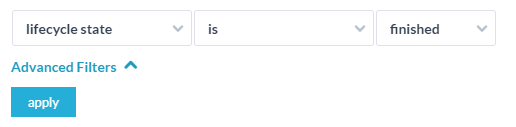
Step 4: Click the ![]() icon next to any tickets type and add the following filter: lifecycle state + is + finished. Click Apply.
icon next to any tickets type and add the following filter: lifecycle state + is + finished. Click Apply.
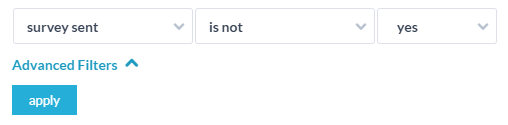
Step 5: Click the ![]() icon next to lifecycle state is finished and add the following filter: survey sent + is not + yes.
icon next to lifecycle state is finished and add the following filter: survey sent + is not + yes.
Step 6: Click undergo trigger condition and select: schedule job + every day. Click Apply.

Step 7: Click actions taken and select: send email template + the survey email template + recent requester. Click Apply.
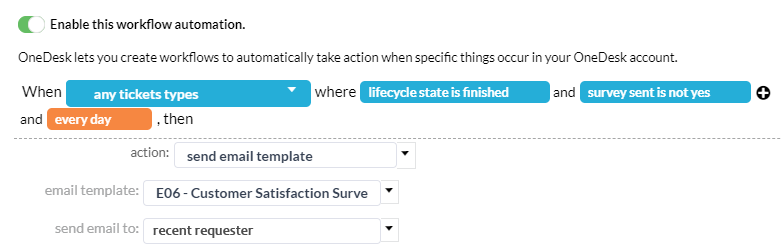
Step 8: Click the ![]() icon next to send email… and select: change custom field + survey sent + yes. Click Apply.
icon next to send email… and select: change custom field + survey sent + yes. Click Apply.
