Updated: Aug ’22
A key aspect of both helpdesk and project management for many of our users, is the ability to capture the time spent on various activities. Users want to record the time their team spends on tickets and tasks for a variety of reasons including:
- Billing their customers for the time spent on tickets, tasks and projects.
- Automatically generating “actuals” for their work, so that they can compare reality to the planned work, costs and schedules.
- Recording the time spent on various activities so they can plan resources around upcoming projects and business growth.
- Discovering opportunities for optimization, and therefore require details of where their team is spending its time.
For these reasons and more, OneDesk has some great tools to help capture the time spent on various activities:
Timesheet Capture: Create timesheets by clicking on any task, ticket or other items, enter the number of hours spent and the current %complete.
Task Timers: Start, pause, and stop work timers on tasks and tickets, to automatically capture time spent.
Mobile App: Use time-sheets and timers from the main app or the mobile app, which allows for logging work directly from your phone.
Once the work is captured, it will serve to update the actuals in your projects, but there is a lot more you can do with this data.
Group and filter your timesheets.
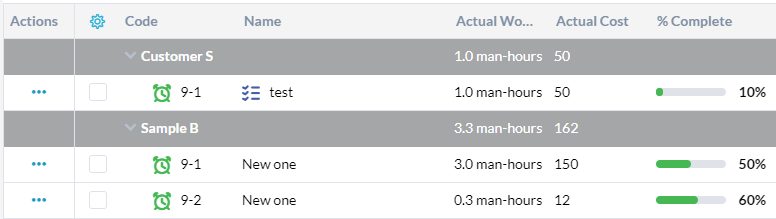
There are a lot of ways to look at the time you’ve spent on tickets and tasks. You may want a worklog to see the hours that your team logs daily. You may want to compare the hours logged for different team members. You may want to see the time spent on a particular project or for a particular customer. OneDesk gives you all this, by providing you with powerful filtering and grouping options.
In the timesheets application you can select any of the saved views on the side to display your logged work grouped by date created (Work Log), by approval status, from various time periods (Last 7 days, Last 30 days) and more. More importantly you can also create your own views to slice and dice your data the way you want.
Let’s run through an example: You may want to group the work performed by requester (the customer or customer organization for whom the task or ticket is being performed). To do this you just need to take the following steps.

1) In the timesheets application click the “New view” icon
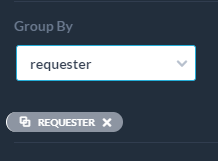
2) Select “Group by: requester (organization) or requester (individual)” and click out of the side panel.
3) If you will want to re-use this view in the future, click “Save”. You will then be asked to give the view a name, and determine if you want this to be a view that is shared with the other users in your organization. The view will then appear in your left panel for you to re-use over and over again. (See also Video: Creating Custom Views)
You can use a similar approach to create views to group-by or filter-out billable work, work by user, by project, and lots more.
Export your timesheets.
OneDesk makes it easy to capture the time spent on work so that you can track and bill for it. However, you will often need to get your data out of the system to do further analysis or manipulation. OneDesk makes this easy by allowing you to export your timesheets at any time with just a few clicks.
Let’s run through an example: You may want to export the time spent in the last 30 days, of billable hours, for a particular customer.
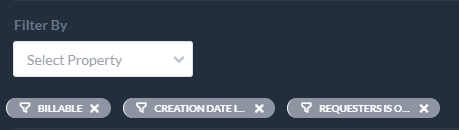
First filter the view to see the data you want.
Then from the action icon (three dots) on the far right side select “Export this view (csv)”
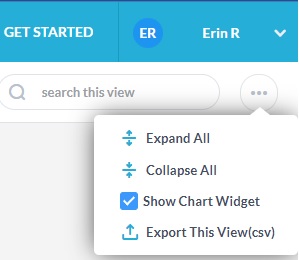
The timesheets will be downloaded as a .csv file which you can open in Excel.

Push your timesheets to an invoicing or billing app.
If your company wants to bill or invoice your customers based on the time captured, you have a couple of options to get your timesheets automatically synced directly to your invoicing/billing app. If these options don’t work for you, you can usually import the CSV file that you exported in the previous step directly into your app.
Option 1: Use Our Timesheets API
Using what is known as our “Worklogs API” you can request the worklogs based on a variety of criteria. You will need to have access to programmers to put make use of this, but this provides a flexible way to get the data out of OneDesk in the manner you require. You can read about it here.
Option 2: Using Our FreshBooks or QuickBooks integrations
See our integrations page for more information.
Option 2: Using Zapier:
Zapier.com is a platform that allows you to easily connect different web-apps together. To use it you will need to sign up for a Zapier account and search their site to see if your destination application is one they support (it usually is, since they support hundreds of popular apps).
To make your life easier we have created a few “zaps” that connect OneDesk to common invoicing and accounting applications. To get started with these connectors do the following:
- In your OneDesk account go to Administration -> Integrations -> Zapier Integrations
- Click the Use this Zap button next to the connector you want.
- Fill out the form.

These basic zaps will do a simple integration that pushes timesheets from OneDesk to the destination app as soon as they are created. However if you want more complex logic, (to map specific properties, to to push only billable hours, etc…) then you will need to modify the base zaps. let us know if you need assistance.
Related Articles