With OneDesk you can help your customers to help themselves! Decrease your support costs by providing articles about your products or services, so that your customers can easily find answers to common questions.
What exactly is the OneDesk Knowledge Base?
A knowledge base is a customer-facing app (Customer App) that you can offer to your customers so that they can find answers to questions – quickly and easily. Essentially, your team writes helpful articles and places them in categories. You customers and website visitors can browse these categories, and search these articles to find the answers they need.
How do I set up the knowledge base for my company?
You can set up a knowledge base in OneDesk quite quickly. After that the size of the knowledge base will grow as you add articles. But OneDesk makes writing articles easy too. You can create a new article from the top add menu. If you have a ticket that you think would be helpful to your customers, you can choose to simply clean it up and publish it as an article.
Here are the steps to setting up your knowledge base in OneDesk.
1) Create categories
Create categories under Administration > Knowledge Center > By Category.
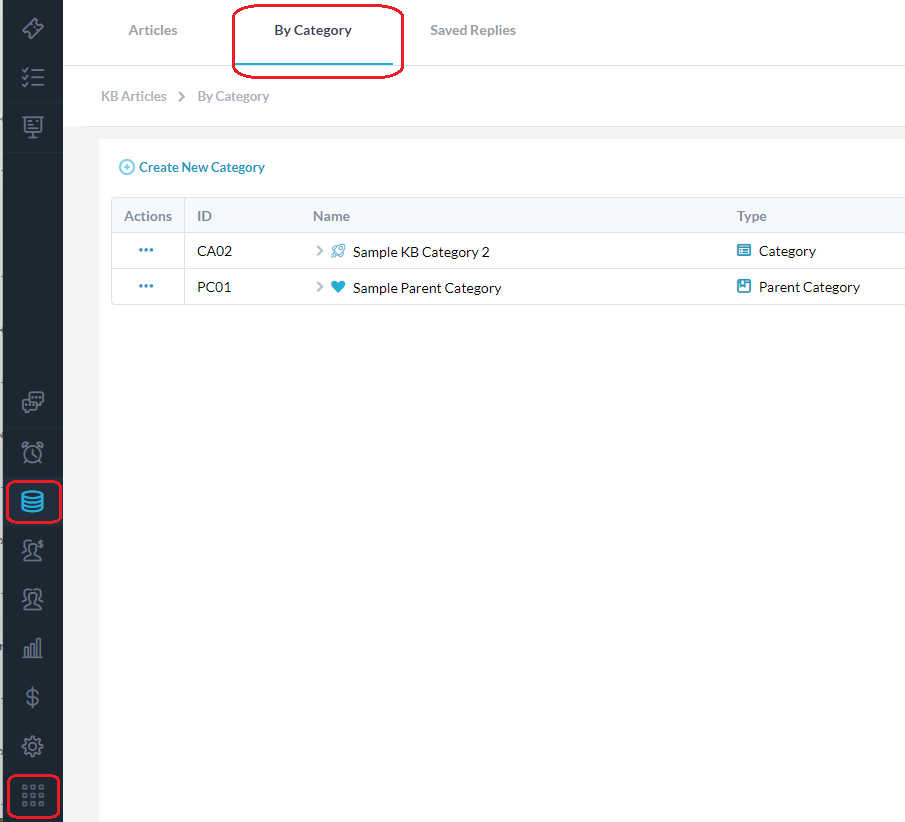
Click on ‘Create New Category’ and create a category. In the ‘Create New Category’ popup, you should add a Name and Description. You can also change the icon or put the category into a ‘Parent Category’, but I recommend you do this later.

You can then proceed to make as many categories as you want. If you want to add more levels to your category hierarchy, you can create ‘Parent categories’ to hold your categories. It is important to note that parent categories cannot hold articles directly but can only contain categories or other parent categories. In other words, only categories can contain articles. Essentially, use parent categories to create more structure.
2) Create Articles
Creating an article is just like creating any other item in OneDesk. By default you can do this by clicking ‘Add > Knowledgebase Article’, but you can actually use any type of item as an article (Tickets, Tasks etc.).

Fill in the name and description. The name will be the title of the article and the description will be the content.
You must also add the articles to categories and you can do this either from the article details or from the category itself. To do this from the article click on the ‘Add to Category’ button. Then you must select the category where you wish to include the article. Articles are only published once added to an article. This way you can create and article and work on it from the detail panel without revealing it on your KB.
3) Create a knowledge base (you may already have one)
New accounts will have their first knowledge base turned on by default, but older accounts will need to create one. OneDesk lets you have multiple knowledge bases so you can create more following these steps.
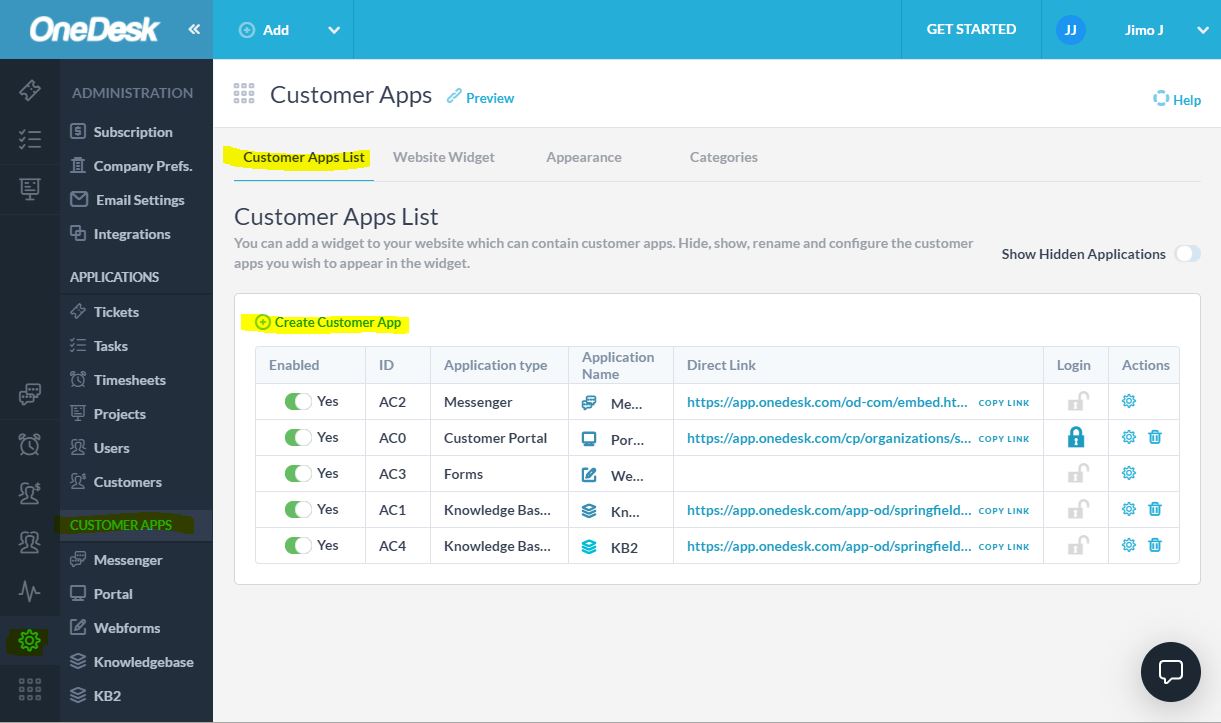
Go to Administration > Customer Apps > Customer Apps List and click ‘Create Customer App’
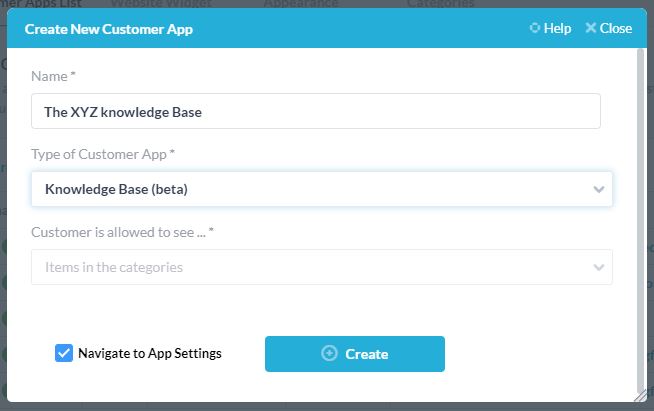
Fill out the form as follows and click ‘Create’. You will then be navigated to the options page for this new knowledge base.
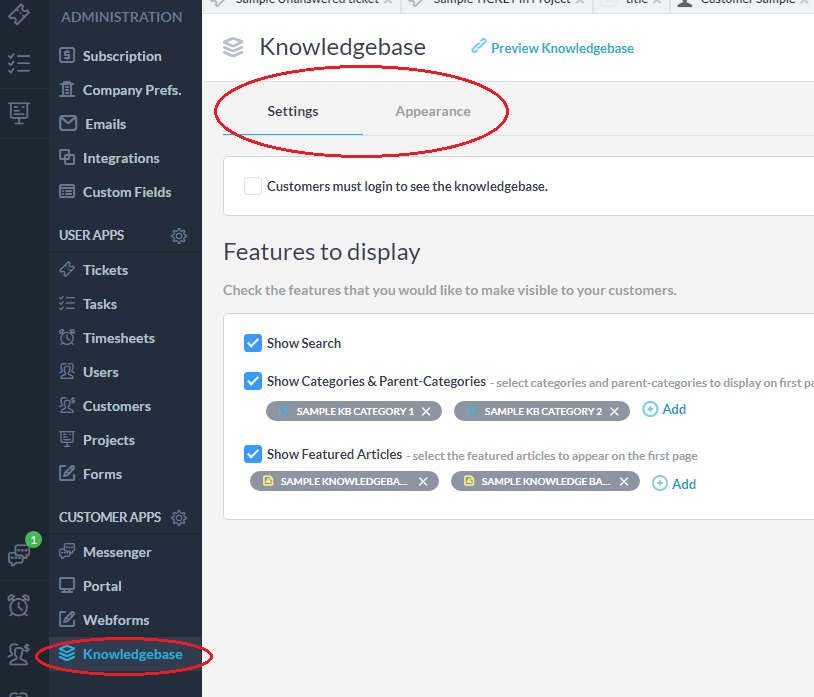
4) Configure the KB options
You can configure the settings for your knowledge base on this page. If you did not navigate the configuration options page can be found under
Administration > (the name of your new KB)
- You can choose the hide the following features: Search, Categories, Featured Articles
- You can change the text on the page for: the Welcome Text, and the Title for Featured Articles.
- You can select which categories to include in your knowledgebase
- You can choose some featured articles to be pinned to the front page of your KB
5) Put the categories in your knowledge base
Of the configuration options, the most important is to choose the categories to include on your knowledge base. Since you can have multiple knowledge bases, not all categories will necessarily be included in a KB. Once the category is included in the knowledge base, any future articles that are added to the category will appear in the knowledge base.
IMPORTANT NOTE: Knowledge bases contain categories, and categories contain articles, so you must do both steps of A) including your article in a category, and B) including your category (or its parent) in the knowledge base.
6) Put it live on your website!
In OneDesk the Knowledge base is just like any other customer-facing app (like the live-chat, ticket-portal, ticket forms, etc.). You can therefore include it in the widget, or you can use it directly.
To add it to the widget
If you have the widget already on your website (you should), then simply make sure that the knowledge base is enabled in the widget. It is active by default so you probably don’t have to make any changes here.
To use the KB directly
If you are not using the widget, then you can link to the knowledge base from your website, or embed it in an iFrame. To do this, first retrieve the direct URL of the knowledge base under Administration > Customer Apps > Customer Apps List. Check out this article for complete steps: Adding Customer Apps to your Website.
I have thought so many times of entering the blogging world as I love reading them. I think I finally have the courage to give it a try. Thank you so much for all of the ideas!