One of the advantages of using OneDesk is that it allows you to import files and keep working on them in OneDesk for a more streamlined business process. Importing files allows you to save time entering items – imagine needing to manually enter hundreds of feedback, ideas, help desk tickets, issues or tasks.
Bringing your project files into OneDesk results in many advantages – learn about them here.
You can import tickets or tasks using CSV, MMP or MPT format.
You can also import the following items into OneDesk via CSV format:
- Projects and Portfolios
- Portfolios only
- Users and Teams
- Customers and Customer Organizations
For detailed how-to guides on importing specific items, see the following knowledgebase articles:
Importing a File into OneDesk
Step 1: Click Tools on the top bar
Step 2: Select Import
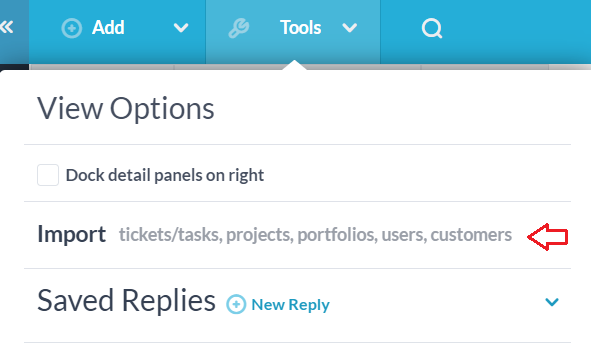
Step 3: Select the item to import (tickets, users, projects, etc.)
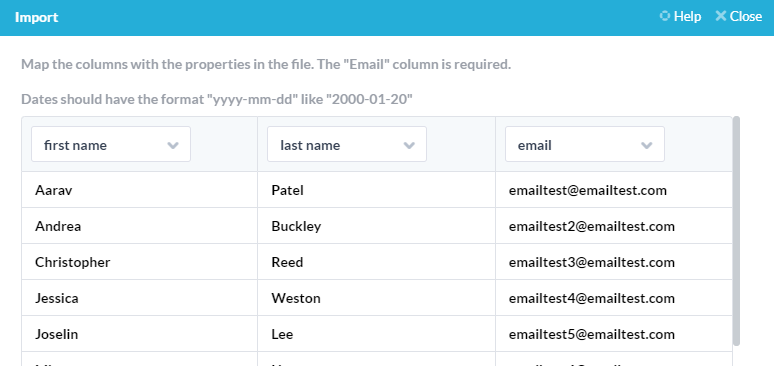
Step 4: Upload the csv file you wish to import.
Step 5: Map the columns to the appropriate fields by selecting the field name from the dropdown menus. (Please see the above knowledgebase articles for details on available fields or minimum required fields for your import type). When finished mapping, click Import, then Done.
Exporting Files
In OneDesk you can export your work views in Tree or Flat view from the following applications:
- Tickets
- Tasks
- Projects
- Timesheets
- Items
- Features
- Financials
When you export you are exporting your current view. This means any filters or searches you have applied, any columns you have added or removed, or the currently applied grouping, will be reflected in the exported file. For example, if you want to export a view of ONLY tickets in a ‘resolved’ state you would first apply the filter: lifecycle status > is > resolved. For detailed information on filtering or grouping data or creating custom work views, see our video on Work Views.
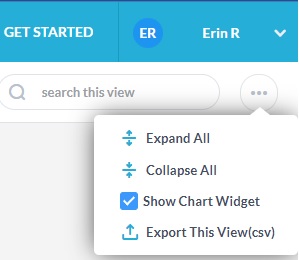
How to Export
Step 1: Select the application you want to export from (see the above list)
Step 2: Under your profile in the top right, select the “action icon” (three dots)
Step 3: Select “Export This View”