What are SLAs?
Service Level Agreements (SLAs) are policies that define the level of service you deliver. These policies usually codify how long you will take to respond to customer service requests, how long until you deliver a fix and how much it will cost. Often times these SLAs will be in the form of an agreement or contract with a specific customer, but frequently they will simply be a policy the company puts in place for all customers.
Whereas the contracts with customers may have revenue and penalties defined in them, general SLAs are used to measure and improve the responsiveness of the customer support team, and increase customer happiness.
How can helpdesk software help you deliver on Service Level Agreements?
Helpdesk software makes it easier to use SLAs in your company by providing a few useful features:
- The ability to define one or multiple policies that cover your response and resolution times for tickets.
- Tools to automatically associate incoming tickets with these policies, with flexible rules to associate different tickets with different policies.
- Notifications sent to the assigned CSR prior to being in breach of the policy so that they can respond in time.These features together let you define your service level policies, assign tickets to them, and keep your team appraised of what they need to focus on.Here is how OneDesk in particular delivers these features:
Defining your SLA policies:
Open your Administration panel and select the “tickets” tab. Scroll to the bottom to see the SLA section.

- By default SLAs are enabled on tickets and there is a sample SLA policy (called “Sample SLA”) already created.
- If you want to hide SLAs on tickets, just flip the switch. You can turn SLA’s on for tasks and features too, but this is a rarer use-case.
- You can delete or modify the sample SLA policy or create a new one by clicking “create SLA”.
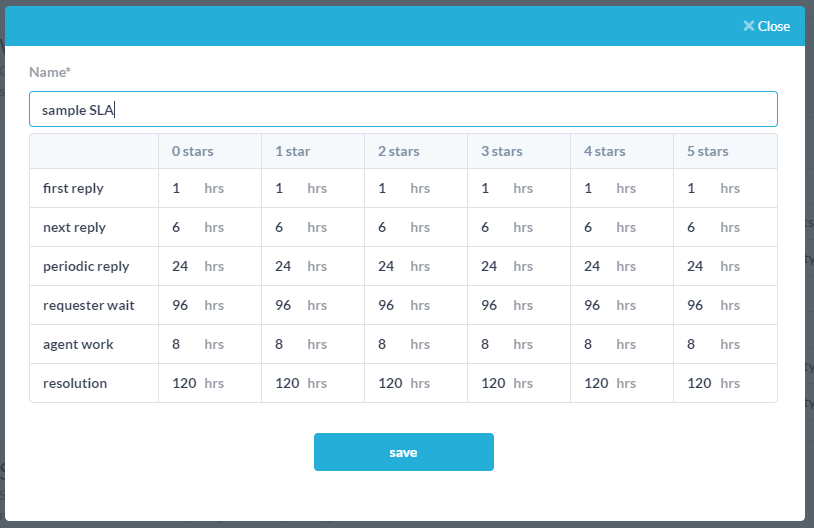
To create an SLA policy, just fill out the form by giving it a name, and completing the grid of times vs. ticket priorities for each type of reply. To understand the different types of replies, read the section below “Understanding the SLA policy”. Once saved, the policy appears in the list of SLAs.Applying the SLA policies to tickets
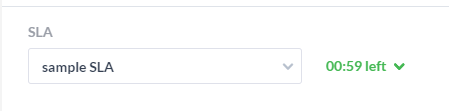
Once you create your policies you need to associate tickets with them. On the ticket details you can see the SLA that is applied to that ticket, and you can change it there as well.
However, you are not going to manually apply the policy to each ticket, but instead create a rule using the workflow automation engine to do that for you. To do this, go to Administration > Tickets , and scroll to the “workflow automations” section. Make sure “Show disabled automations” is ON.

Here you will find an automation rule called “Assign new ticket items to sample SLA” which does exactly what it says. When a new ticket (of any sub-type) is created, it will assign that ticket to the sample SLA. You will want to modify this in a couple of ways:
- Make sure it assigns the tickets to your new SLA policy instead of the sample SLA
- Add any filtering rules if you only want a subset of tickets to be assigned to that SLA. For example, you may only want to assign the ticket to the SLA when it is from a specific “customer organization” or when the requester’s email address contains a specific domain.
- You can create multiple workflow automations to assign different groups of tickets to different SLAs.
Notifying assignees of upcoming breaches.
To make sure your team responds in time to deliver the service level you want to achieve, you need to notify them before it is too late. OneDesk takes care of this using workflow automations as well. By default this is found under Administration > Tickets, under a “orkflow Automation, called “Notify agents of upcoming SLA breaches”. This automation is OFF by default, so you will want to turn it ON. If you do not see this automation rule in the list, you can re-create it as follows:
When [Any item types] where [next SLA breach is less than 75] and [every hour], then [send email to assignee]
You will also need to define the content of the email that is sent to the assignee.
Understanding the SLA policy
When creating your SLA policy it can be important to understand what the different types of replies mean.
First Reply: This is time between receiving the ticket and the first reply sent to the requester.
Next Reply: This is the time between first reply and the second reply.
Periodic Reply: This is how long between subsequent replies.
Requester Wait: This is the total time the requester (customer) is waiting for an agent response. This keeps increasing as the customer waits for a response. Note that this time does not include time you are waiting on the customer.
Agent Work: Agent work. This is the number of man-hours of actual work spent on the ticket.
Resolution: This is the time until the ticket is moved to a “finished” state.More details
First reply : For items not in finished state: delay between creation and time and time of first reply to requester
Next reply : For items not in finished state: delay between most recent comment (if that comment is from requester) and current time.
Periodic reply : For items not in finished state: the maximum amount of time allowed between public replies from internal user.
Requester wait time: For items not in finished state: The sum of the time the requester has been waiting minus the time the ticket is in “pending customer” status
Agent work : For items not in finished state: Use timesheets/timer, or special SLA definition of work.
Resolution : For items not in finished state: The delay between creation time and current time or time the ticket was set to closed state (if it is in closed state)