
Integrate your Project Management with Xero using OneDesk
This short article is meant to let you integrate your Project Management with Xero. It contains what you need as well as the instructions on how to get about doing it.
What you need to set this up:
- A OneDesk account (the trial account works too).
- A Zapier account.
- A Xero account.
- The Developper’s access link for our OneDesk application on Zapier:
https://zapier.com/developer/invite/42966/4e4907110b905debeb6a129130fa5c0b/
How this works:
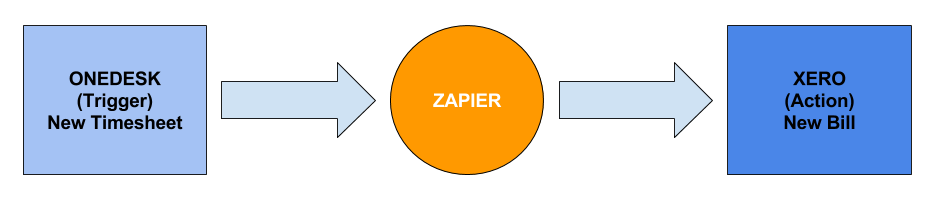
The integration itself is quite a simple process. It works through an online tool called Zapier. Basically, the formula works in this way: if something happens in platform A, then take the following action in platform B. Zapier acts as the connector for these two, and you can instruct it to do specific actions and push and pull informaton out of applications.
Today we are integrating OneDesk with Xero, so the formula should look a little bit like this: When a new timesheet is made in OneDesk, create a new bill.
What you can create by integrating the two:
The formula I list above is not the only combination possible, nor the only useful integration you can make. In fact there are many other workflows that you can create by integrating these two applications and you should most definitely play around with them. For example:
- Whenever a new customer is created or updated in OneDesk, create or update a contact in Xero.
- Whenever a container is set to finished in OneDesk, create a sales Invoice in your Xero application.
How to set it up.
To go about making this integration you first need to go to Zapier and make sure you have our developper’s special code enabled. Find the big “Make a Zap” orange button in the top of the screen and begin the creation process. Zapier refers to automations as Zaps.

The next step is to build the automation itself. We selected a particular automation, so we will follow that structure for the rest of this tutorial.
You need to select the two applications which will be connected via this integration, and since our integration is meant to start in your project management software and go into Xero after, we will pick OneDesk as the Trigger application and Xero as the Action application.
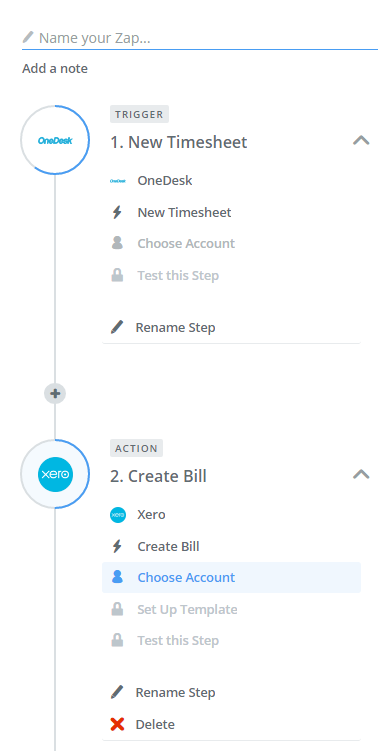
Once those two applications are selected, you may construct what takes place in this integration. Again, we had selected a particular set of actions and triggers and so we will stick to that.
For your trigger application, which is OneDesk, we select the trigger “new timesheet”. This means that whenever a new timesheet is made, something will then happen. For the Action application Xero, we select the action “create bill”.
The process after that is the same for both parts. You will have to log in to your respective accounts both in OneDesk and Xero, and select which information needs to be pulled out of the specific actions that you have selected.
Once you have built your automation the way you want it, you should use the testing tools to make sure it all works according to plan. If it does not, tweak the information and actions until you are satisfied with the results!
The last step will be to name and activate your automation by activating the slider in the top right indicating “Your Zap is OFF”.
![]()
And there you have it, your two applications are now linked together. You can always integrate your project management to Xero further and add more automations to better complete your workflows and minimize manual input of data.
To find more automations like this, and other applications to tie in to your OneDesk project, product and customer service management, you can look elsewhere in the blog, on our website or even book a demo with us.
Photo Credit: “Blue Piggie Bank” / Ken Teegardin / CC BY