
At OneDesk, we know that successful project management starts with organized project planning. Hence, our easy-to-use project planning tool provides project managers with all the features they need to make the process planning process a smooth one.
Steps to efficient project planning with OneDesk.
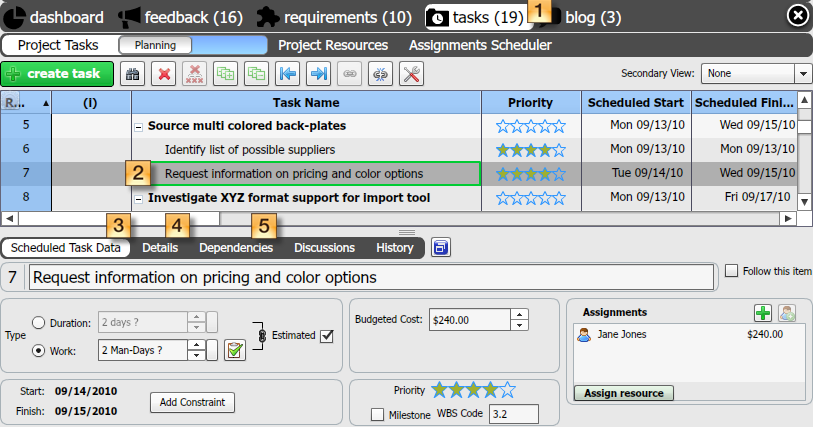

1. In your sharespace, go to the tasks view. By default, you will be taken to the project planning view.
2. Select the task you will plan out.
3. Under scheduled task data, enter all information about the task.
-
- In the Task Type box, enter how long it will take to complete the task by either duration (number of days) or by work (by number of man-days). A man-day refers to one person working for one day. For example, two people working on 14 man-day task should finish in 7 days.
-
- When you create a task, it automatically starts on the day that you create it. The finish date is based on how many days or man-days you entered. You may choose to modify the task’s start or finish date by clicking on constraints.
-
- Enter the budgeted cost.
-
- Enter it’s priority, and optionally, mark it as a milestone and enter a WBS code.
- Assign the task to a resource.
4. Under the details tab, write out any details that your team should know about the task. Attach files if necessary.
5. Under the dependencies tab, you can create relationships between your tasks. This allows you to have access to clear data and visuals that will enable you to prioritize your tasks and know which tasks must be done first. OneDesk also uses these relationships to automatically schedule your tasks to get the project completed as soon as possible.
-
- Select the task and click the add button in the task relationships box, and select tasks you wish to form relationships with.
- Click the drop down arrow next to each task, and select the type of relationship.
A useful project planning tip
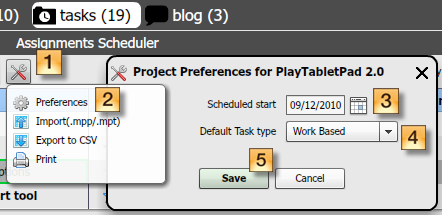

You can set all your tasks to start on the same date, as well as define the task type for all tasks at once. Simply follow the instructions below, and refer to the image above.
1. Click on the project tools button.
2. Select preferences.
3. Choose the date to wish all tasks to start on.
4. Choose a task type.
5. Save.
Was this helpful? We always look forward to hearing your feedback and would be happy to answer questions about using OneDesk anytime.