It is a common use case for multiple departments in an organization to want to work in a single OneDesk account, yet do not want to see the other departments’ tickets. For instance, the IT department and HR department may not want to see each other’s tickets either for privacy reasons or because they do not want to be bogged down by irrelevant work items.
OneDesk has flexible tools to organize tickets as well as automatically route tickets to the right agents. This article will explain how to organize your work to keep departments separate, including the optimal routing and organization, with various examples based on company workflows.
About using projects
In OneDesk your work (tickets/tasks) are contained in projects. Projects can be used for planning, but also for the organization and separation of work. Projects in OneDesk must be shared with users. Sharing is typically done on a team (department) basis. When a project is not shared with someone, they do not see the project from their work views and also cannot see anything contained in the project. So if you do not want a department or individual to see tickets, place those tickets in a project that is not shared with them. For example you can have one (or many) projects for the IT department and their tickets, while another project (or many projects) for the HR department and their tickets.
With this understanding, let’s explain a few considerations for your set-up. Then we will go over how we can easily auto-route and organize our tickets into the right departments projects.
Note: Administrators are able to join projects not shared with them from the project discovery tool. Non-admins can see project names from the project discovery tool and can request an invitation, but cannot join until their request is approved by a project manager.
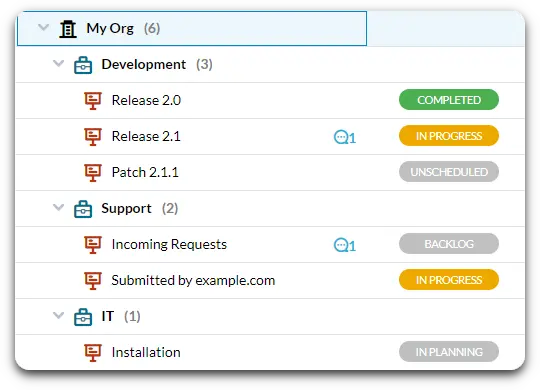
Tip: Use portfolios as organizational tools. For example, above portfolios are named after the department and are grouping each department’s projects together. The other department won’t see portfolios if all its projects are not shared with them, but portfolios make structure and organization more clear for admin users.
About teams (departments) and roles
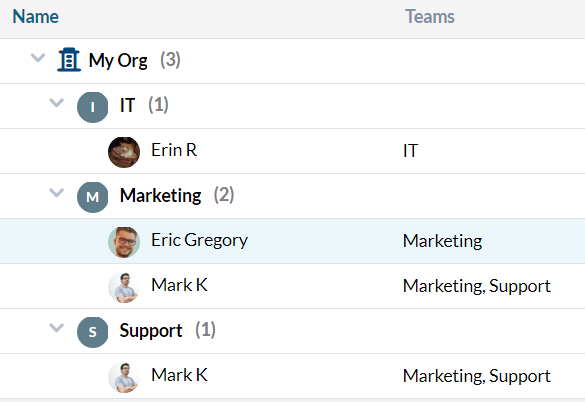
Teams in OneDesk are groups of users. You can consider teams synonymous with departments. The first step to set-up is to ensure individuals are grouped together into the right team. It is possible for a user to be part of more than one team and also have different permission levels within each. You might want to do this if there is a user who needs to see all departments’ tickets, yet you don’t want them to have the ability to modify those tickets.
Learn more about Team Roles
Learn more about Creating Users and Teams
Share / organize projects by department
When creating a new project, be sure to share projects by team. This makes it easier to know who has access to what, as well as making managing roles simpler.
Note: By default, when creating new projects the box to ‘invite all users’ is checked on. While you can manually un-check this box, for this set-up you will not want to invite all users by default. You can turn off this default setting from Administration -> Company Preferences
Learn more about How to Share Projects.

Notifications
The last thing to set-up or consider is your user notifications. These settings are configured on a per-user basis. Head to your Users app on the left side bar, then double click a user to open their settings. Most users will want to choose the option to see conversations ‘Only in your projects’. This option means that from the Messenger, that user will only see and get notified about customer messages in projects shared with them.
Learn more about Notification Settings
Now that we have our organization structure and settings, its time to automate our desired workflow.
Routing Tickets to the right project automatically
OneDesk provides flexible automation capabilities. Automations perform work for you based on set conditions. Tickets can be automatically routed into the correct department’s projects, meaning that organization is done behind the scenes.
How to best automatically route depends on the organization’s workflow. But here are a few common situations and examples of how you can route your tickets.
If each department has their own inbox – route by email queue
You can auto-forward your inbox(es) to OneDesk to automatically capture incoming tickets, if you need information on this process see: Email to Ticket
If each department has a different inbox, for example if you have IT@company.com and HR@company.com, you can auto forward each inbox to capture tickets in OneDesk.
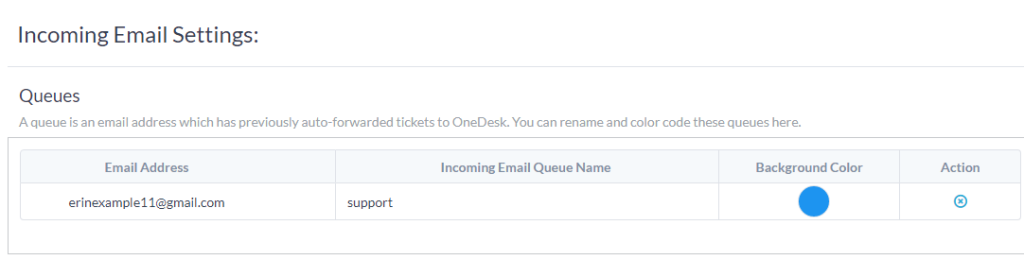
Any email inbox you auto forward from is recorded in OneDesk as a ‘queue’. You can see all inboxes which have been forwarded into your account from Administration -> Emails -> Settings (you can rename and color-code your queues from here as well. For detailed info on queues see also: Email Queues)
Based on the queue, you can automatically route incoming tickets to the right project. In other words if the queue is HR (originating from the HR email address) it will be automatically placed in the HR Project.
Set up the automation from Administration -> Tickets. The automation set-up is as follows: The automation will run on tickets. Next select the filter for ‘incoming email queue’ and choose the desired queue. The trigger condition will be when the item is created. The action will be to change the project. Select the appropriate project to route into.

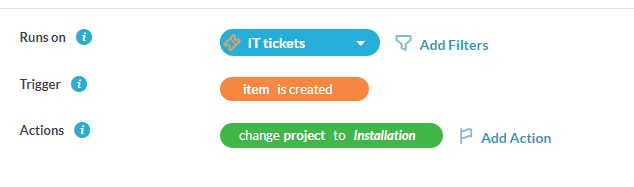
If each department has their own inbox – route by ticket type
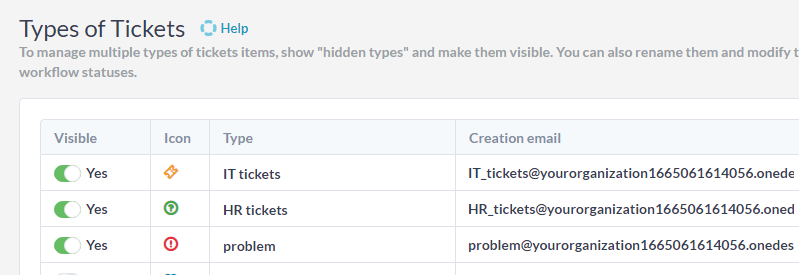
Ticket types are a feature in OneDesk that you can think of like ticket categories. You can have up to ten ticket types with their own name, icon, and statues. The benefit of ticket types over queues is that each type has its own lifecycle statuses and separate automations. In other words they can go through different workflows. Enable an additional ticket type in Administration -> Tickets. For details on ticket types: Item Types
You can auto forward each inbox to the creation email of the appropriate type in order to create that type. In other words, set up an auto forward from your HR inbox to the HR ticket creation email. Then all emails sent to the HR inbox will create an HR ticket automatically. Once your types are enabled you can automatically route tickets to the right project based on the type.
This automation will run on the appropriate ticket type, trigger upon creation, and route to the appropriate project.
Routing by other properties
If your requests come from the same inbox or you are receiving requests in other ways, such as by using forms, you can automatically route tickets in dynamic ways. For instance, you can route tickets to projects based on keywords, source, or customer.
Routing using webforms (support request forms)
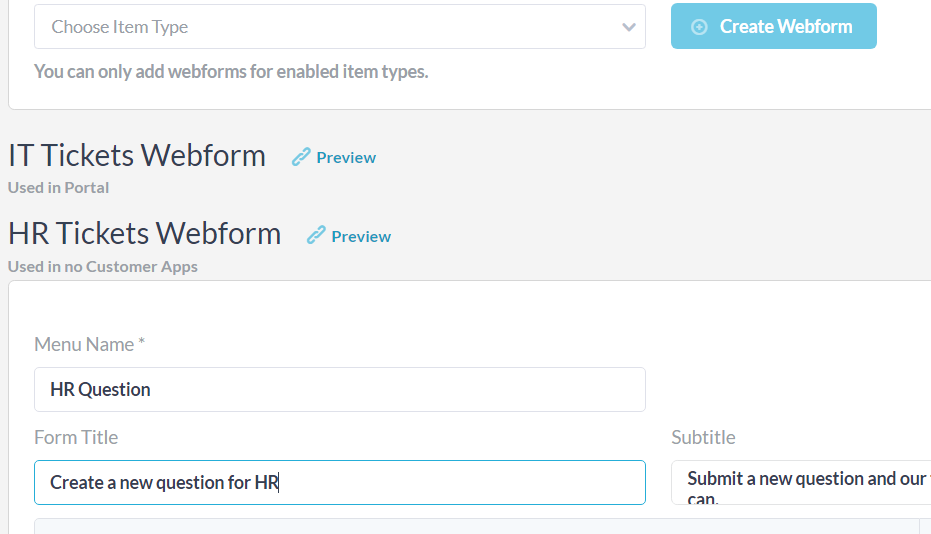
Webform for each ticket type
Webforms, or support request forms, are a method your clients or end-users can use to submit tickets. You can configure webforms for each ticket type you have enabled. The webform for the type will submit that ticket type. For instance enable a HR ticket type, then create a webform for this type. For more on creating webforms see: About Webforms
Like before, we can automate the routing based on the ticket type.
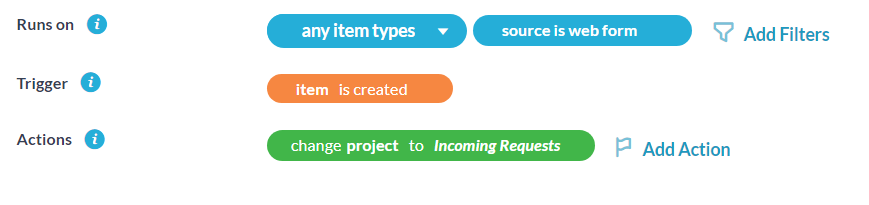
If the origin (source) of the ticket is a webform
In this example, you have two departments, in one department, tickets are submitted by email while another only receives requests through webforms.
In this case, you can route tickets based on the source. The source refers to the channel where the ticket originated from.
Webform custom field
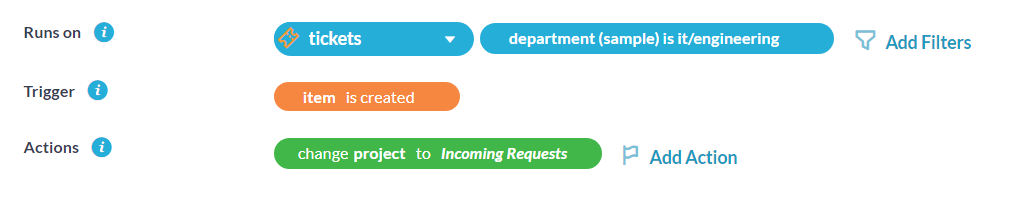
You can add a ‘choice’ custom field to your webform. The choice custom field gives customers an option to select when filling out the form. For example, below I have a ‘department’ custom field. First create your custom field from Admin -> Custom Fields. For more on custom fields see: Custom Fields & Conditional Custom Fields
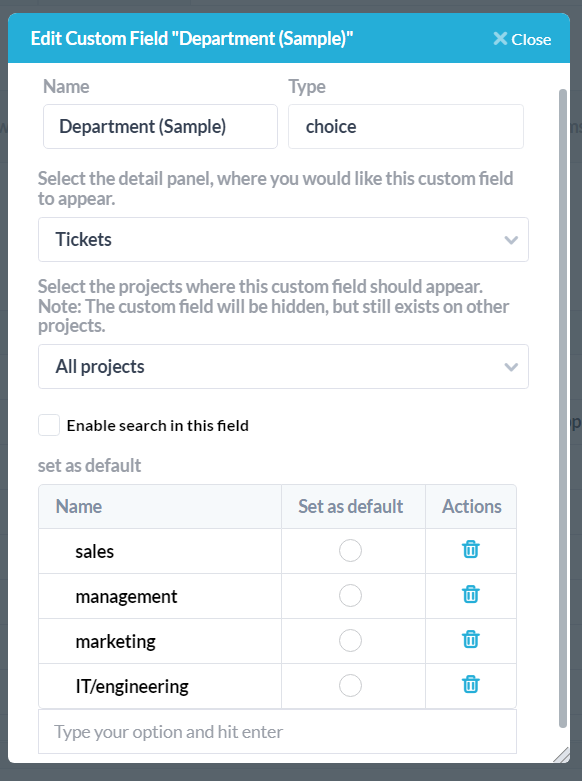
Once created, you can add a field like this to your webforms, then based on the choice a customer makes, you can route the ticket. Here is the example of how to route the ticket based on the custom field choice:
Route based on keyword
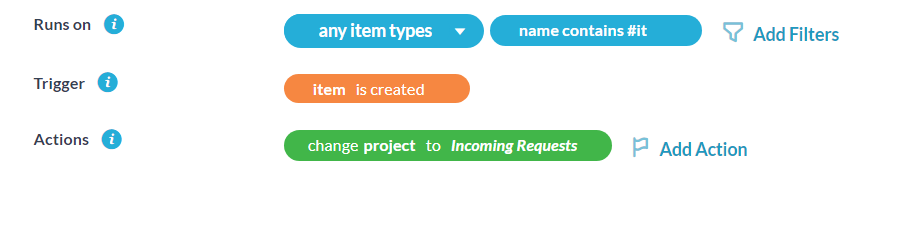
In this workflow example, your organization receives tickets to one email inbox and customers signal in the subject line which department the ticket is meant for. In this case, you can route tickets to the right department based on keyword.
This automation should run on tickets, filtered by name (name corresponds to the email subject line). For the filter, select the keyword you want to route based on. For example, if the keyword is ‘#IT,’ we will route the ticket to the IT department’s project. Like before we should trigger this automation upon creation. The action should be to ‘change the project’ to the appropriate department’s project.
There are many other automations you could potentially use depending on your organization’s workflow. If you have questions feel free to reach out to the support team through live chat or at support@onedesk.com.