
When it comes to customer support, one size does not fit all. Small companies with fewer support personnel have different needs than larger companies with big teams. Even when comparing companies of similar sizes there are a multitude of different workflows that tickets must go through before they reach resolution. So while everyone has different needs, OneDesk has the flexibility to meet most of those needs. You will however need to set it up. This article aims to help you do that.
Start with how tickets are captured.
The first question you need to answer is “How do you capture new tickets?” OneDesk supports capturing tickets from a variety of sources including manual entry, importing, customer portal, web forms, integration and more, but the most common channel is EMAIL.
Setting up email capturing is simple: Just auto-forward your support email to your OneDesk email address. In most cases this means that you need to go into your support email account, and turn on an auto-forward. For example, forward your support@_yourcompanyname_.com to tickets@yourcompanyname.onedesk.com (Replace with your OneDesk email address). We sent you this email address when you signed up, but you can also find it under “Get Started > Channels > emails” in your OneDesk account.
Think about the types of tickets you get
Some companies just lump all incoming tickets into a single workflow, but it is more common to have different types of tickets, each with their own workflow. OneDesk excels at this kind of setup and provides very flexible tools to configure this.
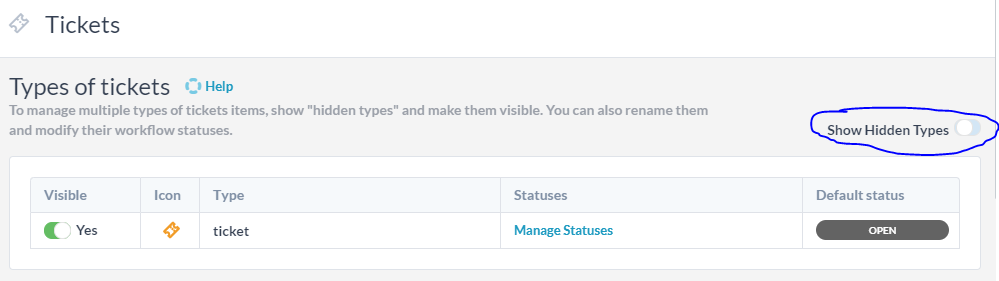
Under “Administration > Tickets” you ca turn on up to 10 different sub-types of tickets. By default only the generic “ticket” is enabled, but you can turn on, rename, and select the icon for the ones you need. When you enable (or rename) a ticket type we provision an email address to go along with it. So for example if you have an enabled type of ticket called “suggestion” then you also now have the suggestion@yourcompanyname.onedesk.com address enabled too. As you might expect, any email received at this address will create a new suggestion in your account.
NOTE: You can have up to 10 types of tickets, 10 types of tasks, and 10 types of features in your OneDesk account. Don’t forget to “show hidden types” to see them all.

For each type of ticket you can set up a different workflow. This means that you set the various steps that this ticket-type goes through as you work on it. For example, a “suggestion” might go through the following steps: new, under-consideration, accepted, rejected, done.
Define your queues
A queue is the assignments, statuses, and views the ticket will flow through on its way to resolution. Since every company will have their own queues they want set up, I will describe the out-of-the-box queue and explain how you could modify it to fit your workflow.
The built-in workflow in OneDesk is as follows:
- An email is received at support@_yourcompanyname_.com
- Which auto-forwards to tickets@yourcompanyname.onedesk.com
- Which creates a ticket in your OneDesk account, and if necessary a new customer record.
- New tickets have the default status of “open” and are not assigned
- The ticket appears in the “unassigned tickets” view
- An auto-reply is sent to the customer
Then someone manually assigns the ticket to someone in your support team.
Once the assigned agent replies publicly to the ticket …
- The response is sent to the requestor by email
- The status is changed to “pending customer” and the ticket appears in the “pending customer” view
Once the customer replies to the ticket …
- The assignee is notified of the response
- The status is changed to “pending agent” and the ticket appears in the “pending agent” view
You can automate and modify almost every part of this workflow.
- You can capture from multiple emails as described above, to automatically create different types of tickets.
- You can change the ticket’s statuses and the default status.
- You can automatically assign the ticket to a user or team.
- You can define rules to automatically place tickets into projects.
- You can modify or turn off the auto-reply, or have different replies for different criteria.
- You can turn off the rules that change status upon reply.
- You can delete the views or create new ones.
To modify these workflows you need to enable, disable, delete, edit, or create “Workflow automations” on tickets.
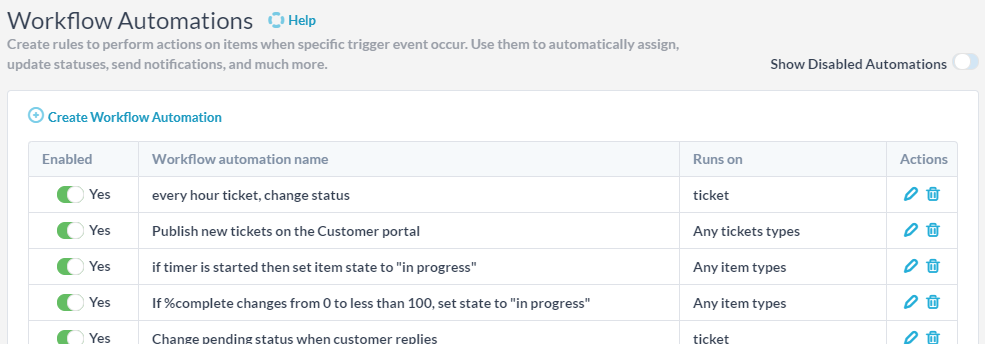

Workflow automations are rules that perform actions when specific trigger events occur. They are composed of 3 parts:
- The affected items: Eg. All types of tickets
- The trigger event: Eg. The ticket is created
- The actions that OneDesk should take on the items: Eg. Post a reply on the ticket


As you can see from the example above this workflow automation will automatically reply to new tickets.
The workflow engine is quite powerful, and before you know it you will be imagining ways to automate lots of things you used to do manually. I recommend you review the automations in your account to see if you want to modify the content of messages. Then try out the default workflow for a few days to get a feel for how it works, before deciding if you want to make modifications.
Let us know if you have questions 🙂