
This is part of an ongoing series where I go over the basic account configurations for different types of businesses.
There are many different types of companies that use OneDesk to support their customers or end-users. For each business model there are a few different configuration changes you will want to make to your OneDesk account. This article covers a setup where you want to support multiple products or services with a single helpdesk.
If your company has multiple different products/services that you need to offer differing support for, you will want to apply this configuration to your OneDesk account.
In the example below I will refer to “ProductA” and “ProductB”, but these could just as easily be services.
1. Creating different types of tickets.
Important Decision #1.
Do I need different types of tickets for the different products?
Assuming you want to process tickets for your products differently, you may need to enable different ticket types. You can do this under
Administration > Tickets > Types of Tickets.
Turn on “Show Hidden types”, switch some types to “visible”, and rename them. You can have up to 10.
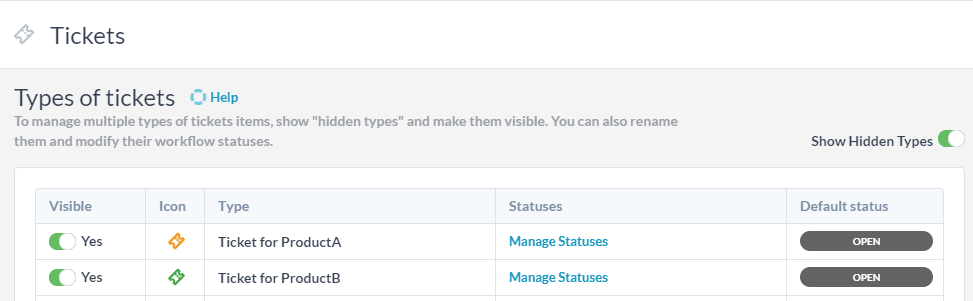

However, you may not need to have a different type of ticket for each product. You could instead add a custom property to the ticket to identify which ticket belongs to which product. There are pros and cons to each approach, read on to decide which approach would work better for your situation.
2. Apply different workflows to the tickets for different products.
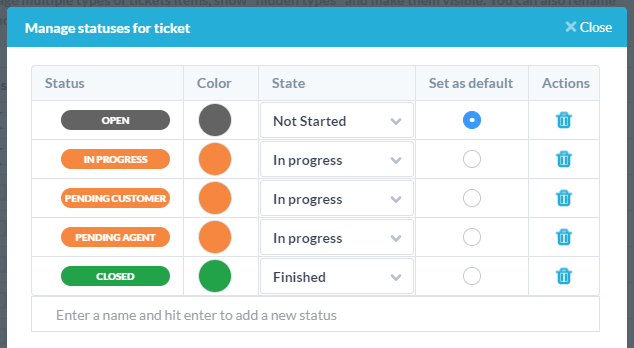
In that same table under Administration > Tickets > Types of Tickets click the link “Manage Statuses” next to each type of ticket that you have made visible. In the popup that appears you can modify the various workflow statuses that each ticket-type can go through.
It is important to note that if you are using multiple types of tickets, then each workflow status is independent across types. (In other words, “open” for TicketType1, is not the same status as “open” for TicketType2). So if you plan on having the exact same workflow for all your tickets, then just create one type.

3. Adding custom properties to your tickets.
3a. If you have decided to have only one type of ticket across all your products, then you will want a custom field to identify which product the ticket relates to.
Under Administration > Tickets > Custom Fields click “Create Custom Field”. Fill out the form as follows and click “Create”.
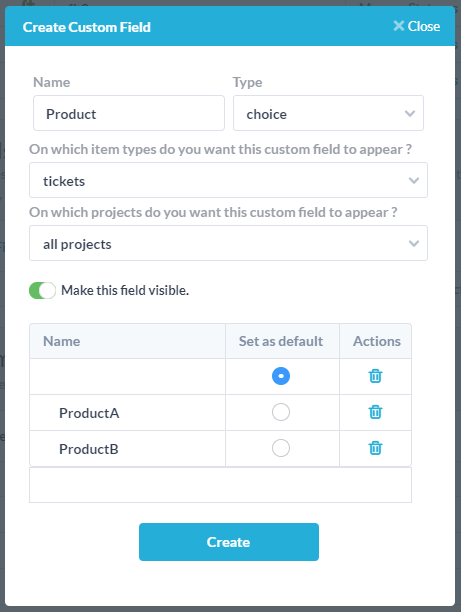
This will create a custom property (“Product”) on your tickets which will allow you to either select “ProductA” or “ProductB”.

3b. You can add other custom fields to your tickets depending on your needs. Make sure that “tickets” is selected for the type of item it should appear on, and make sure “all projects” is selected for the projects it should appear in.

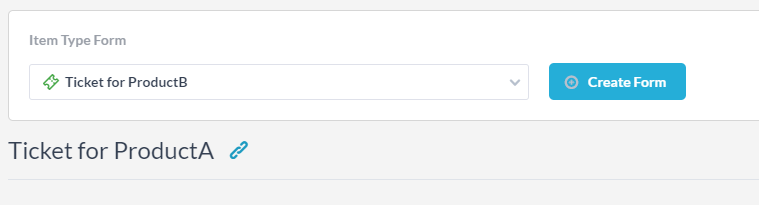
4. Create different customer forms for the different products.
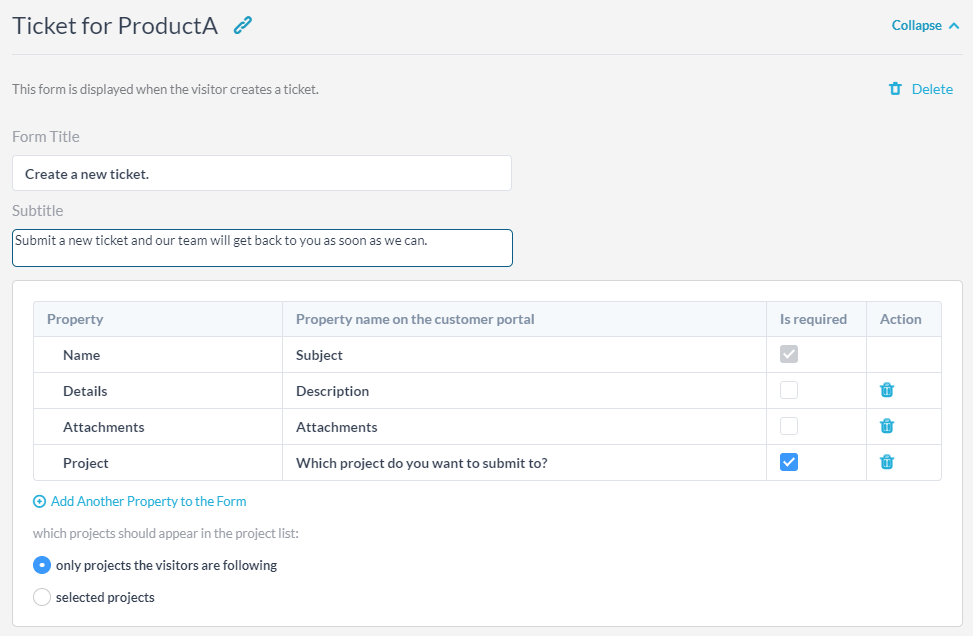
When displayed inside OneDesk your tickets will all display the same properties and have the same creation form. But on the customer portal (that you put on your website) you can have a different form for each type. This is useful if you want to ask different questions for different products.
Under Administration > Customer Portal > Forms select and click “Create Form” for each type of item you want a form for. By default there is already a basic ticket form created. You can delete it or modify it as you require. Any web-form you create will be available for your customers.

Next for each form you will expand it and modify it to meet your needs. It is all pretty straightforward but here are some details you might want to know.
- You can add custom fields to the form, but don’t forget to create them first.
- You can mark as “required” any property which does not have a default. If there is a default set, then that field cannot be marked as required since it will always have a value. Therefore remove defaults for custom fields that you want to require.
- If you add the “Project” property to the form, this allows your customer to specify which project to submit the ticket to. A sub-option will appear allowing you to specify which projects they can submit to.

5. Automatically piping incoming tickets into the right queue/team/project.
When tickets arrive by email, by web-form, or via any other channel, OneDesk allows you to create rules for handling these incoming tickets. These handling rules (often referred to as “putting things in queues”) allow you to automatically reply to the customer, launch a workflow, assign a team or user, place the ticket into a shared project, and send out notifications.
In continuing with our example, we will create handling rules for either tickets of type ProductA, or tickets with custom field “Product” set to ProductA. Under Administration > Tickets > Workflow Automations you will find a set of default rules that perform a variety of actions on tickets. I recommend that you make sure you understand them properly before disabling them (but they are not that difficult to understand). The following rules cover the default handling for new tickets:
- Publish them on the customer portal (leave this on until you understand publishing)
- Assign new tickets to “sample SLA” (turn this off, until you create your own SLA policies)
- Auto-reply to new tickets (leave this on but modify the text of the reply if you want)
Don’t touch the others until you are more comfortable with the workflow.
Here is an example of a comprehensive rule for handling incoming tickets. This is not a default rule, but just an example to show you what is possible.

This rule runs on any type of ticket where the custom field “Product” is set to ProductA. When that ticket is created, OneDesk will create an auto-reply from the bot, put it in the project “New tickets for ProductA”, and assign it to the team “customer support”.

6. Setting up a sensible project structure.
Projects in OneDesk are containers that hold your tickets, tasks, or other items. They are also the level at which you share among your team. When you create your project structure the first question you need to ask yourself is as follows:
Important Decision #2
Are there tasks or tickets that you don’t want to share universally with your team? If so, then the division of what a team-member can see must occur at the project level.
In other words…
- If you want Jill to see a task but Bob to be absolutely prevented from seeing it, then that task must be in a project that Bob does not have access to.
- If Bob and Jill are working on the same product then it is OK if they can access the same tickets and tasks. You can then choose to keep the items in the same project or put them in multiple projects that are shared with both Jill and Bob.
Once you’ve made this decision, you create your projects with this in mind, and then add layers above (portfolios) or below (folders) to add more structure to your hierarchy.
- Portfolios are like folders that hold projects. Use them to group related projects together for example by the product/service they relate to, by the customer they are for, or the department they pertain to. A project can be in multiple portfolios at once and you can nest portfolios as deeply as you want.
- Folders are inside projects and hold items. Use them to group tasks together, put related support tickets together, or however else you would like to organize things. Folders can also be nested as deeply as you want.
So for my example we could end up with a structure like this:

Here I have a portfolio for ProductA. Inside have created a project to catch incoming tickets, and another portfolio that holds projects for each release of ProductA. Some tasks are then grouped together in a folder inside one of the releases.

7. Connecting it all to project and task management.
The last piece of the puzzle is the human aspect of the workflow. You will need to make some of the following operational decisions:
- Who deals with incoming tickets. They may need to respond, assign, prioritize, and move them to differing projects.
- Under what circumstances should a ticket convert to a task?
- Who plans the projects and what criteria is used?
- Do you bill for the hours worked on tickets and tasks?
- What views do the different users in the company need to efficiently accomplish their work?
- A lot more…
In my experience the answers to these questions are not immediately critical and can be worked out and optimized over the first few days and weeks of usage. We are also here to help, so get in touch!