Whether the end-users you serve are from within your company, or whether they are external clients, OneDesk will work for you. However, you will need to configure OneDesk in slightly different ways to achieve the best workflow.
This article will tell you what quick settings to make to fine-tune your setup for serving internal vs. external end-users.
Table of contents
- Configuring OneDesk for Internal End-Users
- Configuring OneDesk for External Customers
Configuring OneDesk for Internal End-Users
An example of servicing internal end-users include an IT team working on tickets submitted by other departments in their own company.
Make the following changes inside OneDesk if you are serving internal end-users rather than external customers.
Internal Quick-Start Step 1: Views and Items (Tickets, Tasks, Projects)
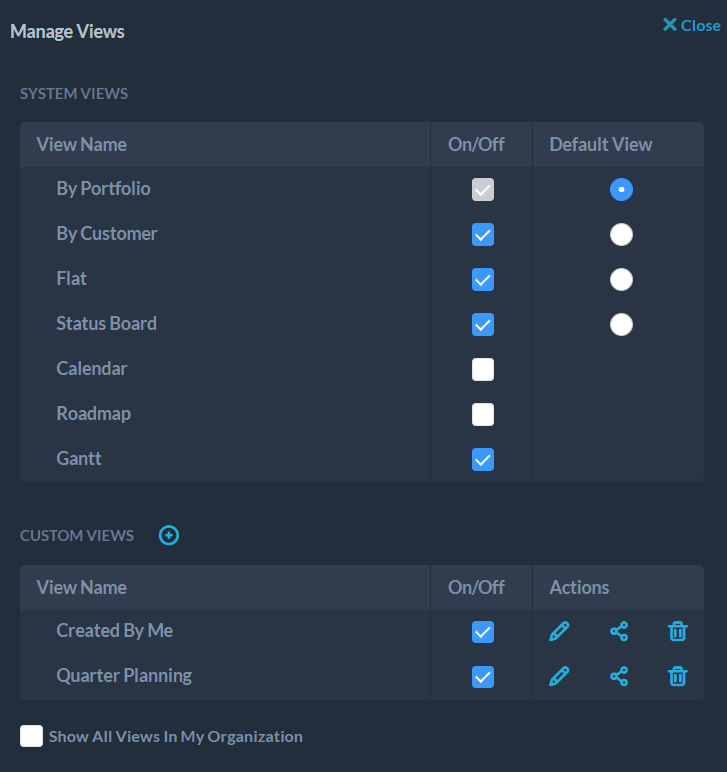
1.1 Default View Setup – By Portfolio
Portfolios hold your projects, and represent the main structure of how you want to organize your projects. They can be named after different departments, teams, or some other categorization which is useful to you.
Since your end-users are all from the same company, turn off the “By Customer” default view. Hover over the “Views” section and select the cog wheel to edit the default views you see. Uncheck “By Customer”.
1.2 Project Setup
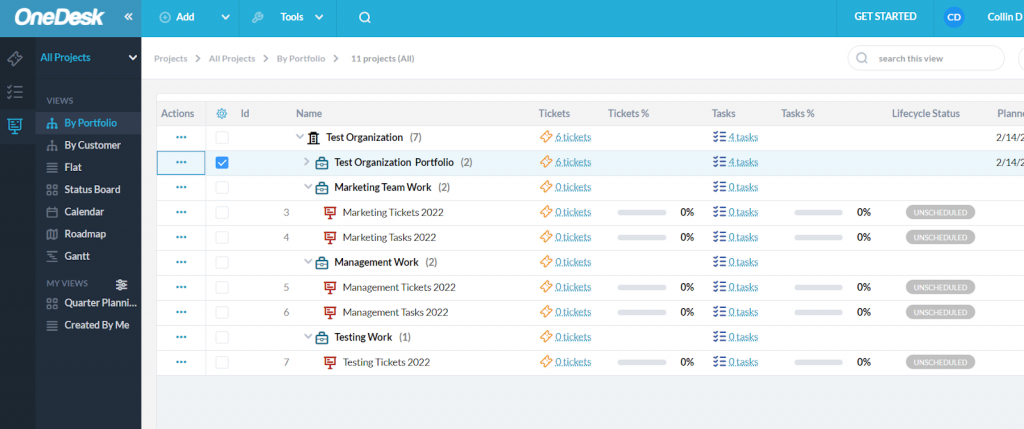
Once you have created portfolios to represent the departments and teams, create projects to place inside these portfolios. Similarly to how portfolios act as containers for your projects, projects act as containers for your tickets and tasks. You can create projects with the same “Add” button you used for portfolios.
To avoid filling projects with too many items over time, break them down in a cohesive manner, such as by quarter or by year. An example of a setup is shown below:
You can also create folders inside projects with the “Add” button. Create folders to further organize your tickets and tasks.
After configuring projects,you are all set to work on tickets and tasks.
1.3 Tickets vs. Tasks, Auto Forward Setup
Tickets will represent the items you are working on for your internal customers, mostly submitted by these customers directly via email, webforms, the customer portal, or through the live chat.
Set your support email (eg: support@yourcompany.com) to auto forward to the OneDesk ticket creation email [ticket@______.onedesk.com]
This way any incoming email your support center receives is created as a ticket inside OneDesk.
More information on setting up auto forward for Gmail, Outlook.

Add your support email to the “Never add as follower” list in Emails -> Appearance Settings to prevent email loops. More info on loops.
Tasks will represent work created by your internal team to work on, such as personal projects unrelated to tickets being submitted by end-users, or further steps to address stemming from a ticket.
Internal Quick-Start Step 2: Automations and Routing
Workflow automations are a powerful tool in OneDesk. When used correctly, automations can greatly reduce the amount of time you spend doing repetitive tasks like assigning items to your users and making sure items are placed in the correct project.
Access automations by selecting more applications -> Administration -> Automation. Automations can be run on Tickets, Tasks, Projects, and Timesheets.
OneDesk maintains a list of useful automations which you can access here.
2.1 Automations to Disable
In the “Workflow Automations” section for tickets, disable the following automations:
- Creating any ticket -> add to “Sample SLA”
- As an internally-servicing organization, SLAs are likely not needed. If they are, create your own from the “SLAs” section and add them to this automation instead of the sample.
- Changing status to “finished” on any ticket -> send Customer Satisfaction Survey
- As your customers are colleagues in the same organization, you probably don’t need to have a satisfaction survey be sent.
In the “Workflow Automations” section for tasks, disable the following automation:
- Updating status on any task -> create a customer reply
- Since tasks in internal organizations should be for independent duties, there is no need to inform users when their status is changed, as users will do it manually.
Internal Quick-Start Step 3: Customer Apps
As an internal group working on items for other users in the same organization, your customer apps will be where colleagues go to submit tickets and to check the status of the items you are working on for them.
Internal service organizations will embed the customer apps widget onto the homepage of their support center or intranet. Alternatively you can just supply your end-users with direct links. To embed the widget, go to more applications -> Administration -> Customer apps -> Classic App Settings, and scroll down to the “put the widget on your website” heading.

Customer Portal, Webforms, and Knowledgebase are also available as standalone pages. These can each be accessed by direct links found at in the “Customer Access URL” column in the customer apps settings. Links to these standalone pagescan be placed on your support center or embedded as iFrames.
More information on embedding:
3.1 Customer Portal Setup
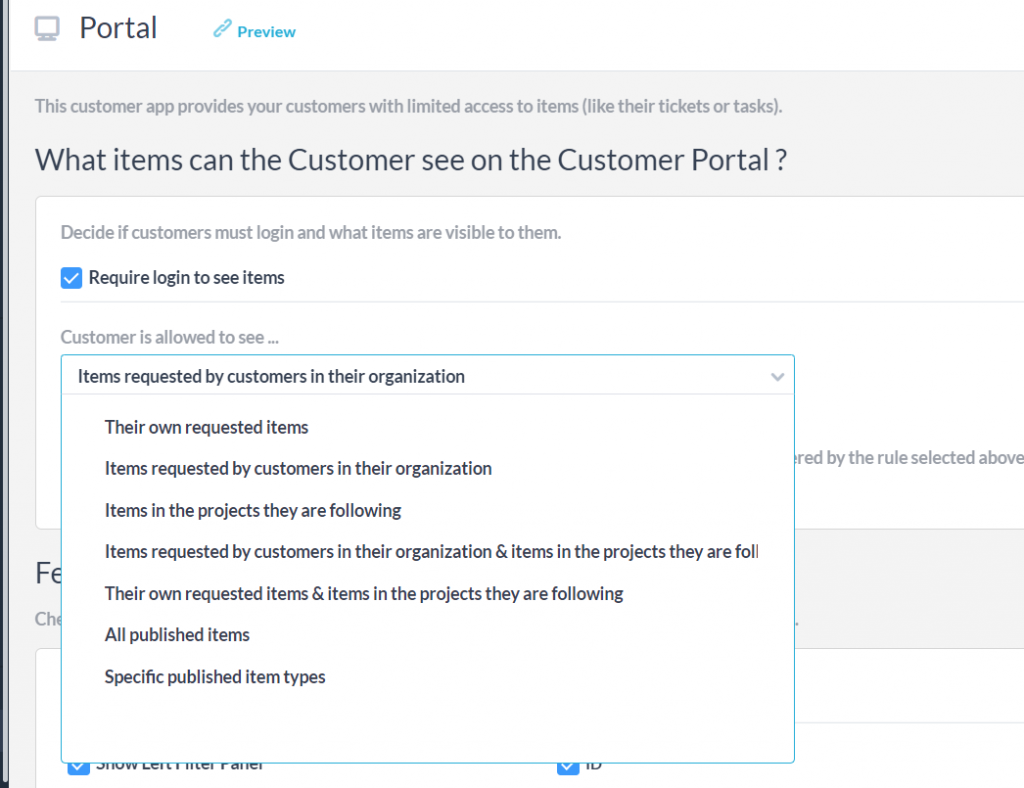
Internal-service organizations should change their customer portal visibility settings such that end-users can only see items which they are marked as requesters on.
Access the customer portal settings from more applications -> Administration -> Portal, and select the option “Their own requested items” from the dropdown under “What items can the customer see on the Customer Portal?”:
After following these steps, your internal-facing support organization has hit the ground running with OneDesk.
Configuring OneDesk for External Customers
OneDesk is well-equipped to handle an organization’s operations when you are supporting external customers. There are a couple of settings to change to get a head start on keeping things organized for external-service organizations.
External Quick-Start Step 1: Views and Items (Tickets, Tasks, Projects)
4.1 Default View Setup – By Customer
As an organization working on items for external customers, use the “By Customer” view as your default way of looking at projects. This view forgoes portfolios.
Turn off the “By Portfolio” view by hovering over “Views” on the left-hand side and selecting the cog wheel. Uncheck the “By Portfolio” view and set “By Customer” to default.

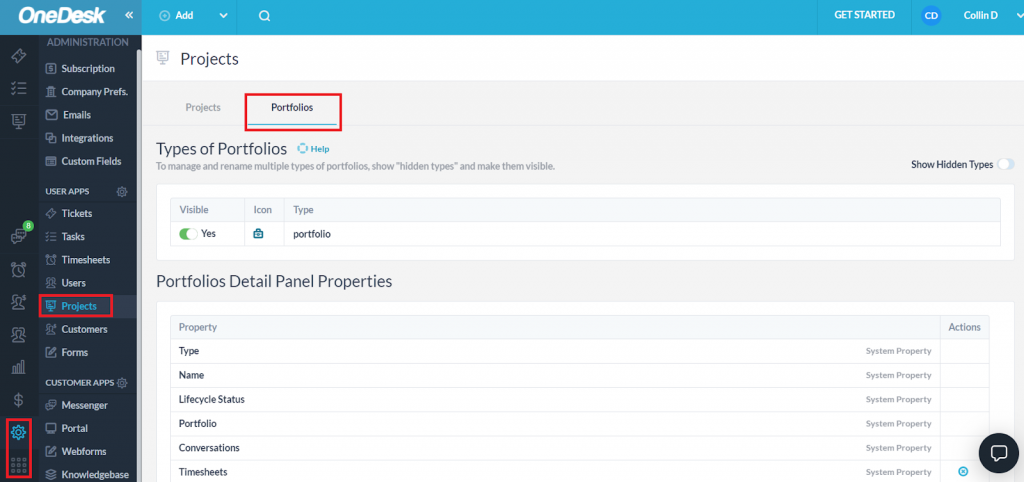
To keep things simple, you can turn off the portfolio item type entirely by going to more applications -> Administration -> Projects -> Portfolio tab, and toggling the portfolio item’s visibility to off.
4.2 Project Setup
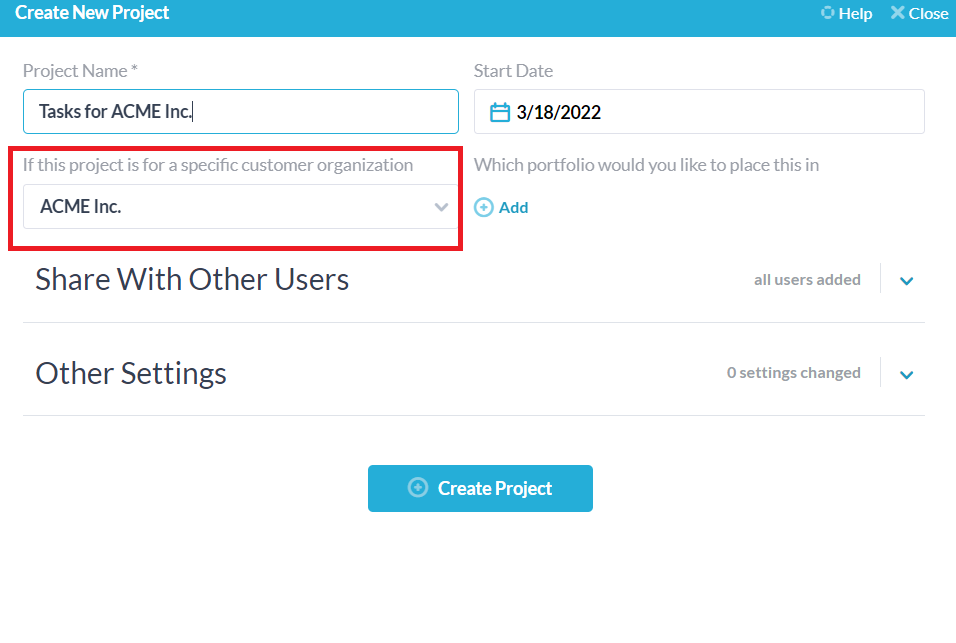
If you are working on a project for a particular client, you should add the customer organization when you create the project.
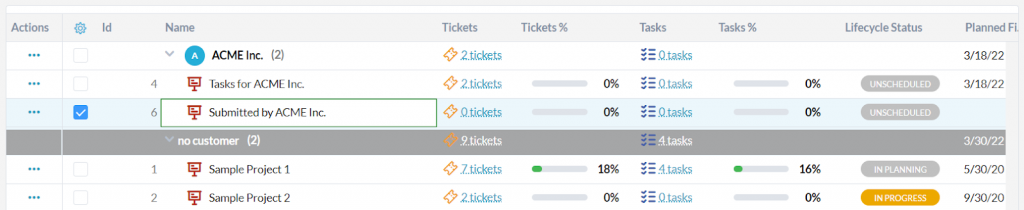
OneDesk can automatically create projects to contain the tickets for a customer organization (more on this later). An example of projects in the “By Customer” view is shown below:
Create folders inside these projects to further organize your work.
4.3 Tickets vs. Tasks, Auto Forward Tickets
Tickets will represent the items submitted by your external clients directly via email, webforms, the customer portal, or through the live chat. These are usually worked on as a priority.
Tasks, on the other hand, represent longer-term work you are doing, either for a customer or internally. This is any work which is not a ticket.
Set your support email to auto forward to the ticket creation email [ticket@______.onedesk.com] in more applications > Administration > Tickets. This way any incoming email your support center receives is created as a ticket inside OneDesk.
More information on setting up auto forward for Gmail, Outlook.

Add the support email you are forwarding to the “Never add as follower” list in Emails -> Appearance settings to help prevent email loops. More info on loops.
External Quick-Start Step 2: Automations and Routing
There are some automations you will want when serving external customers. Access your automations by going to more applications -> Administration -> Automations
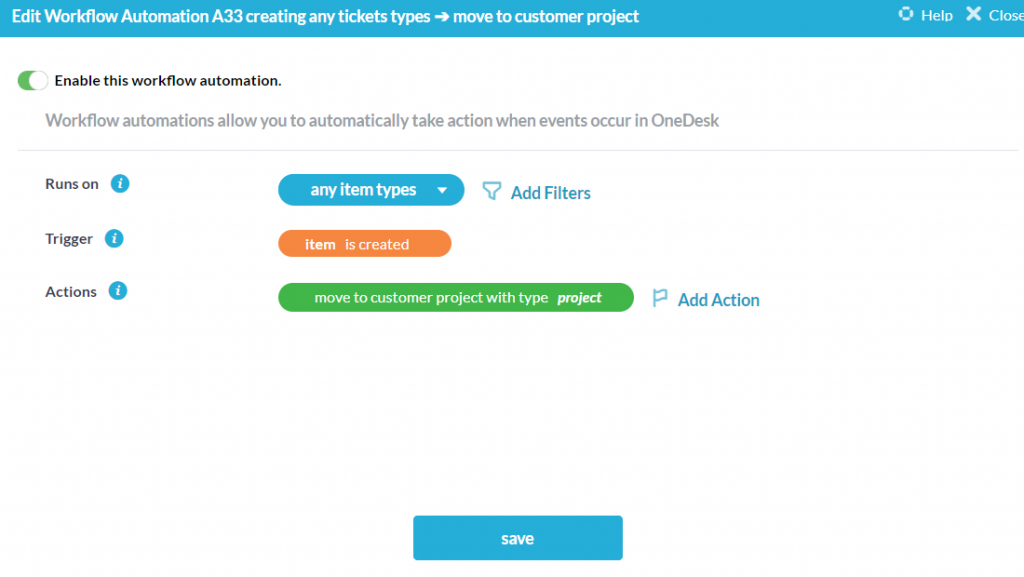
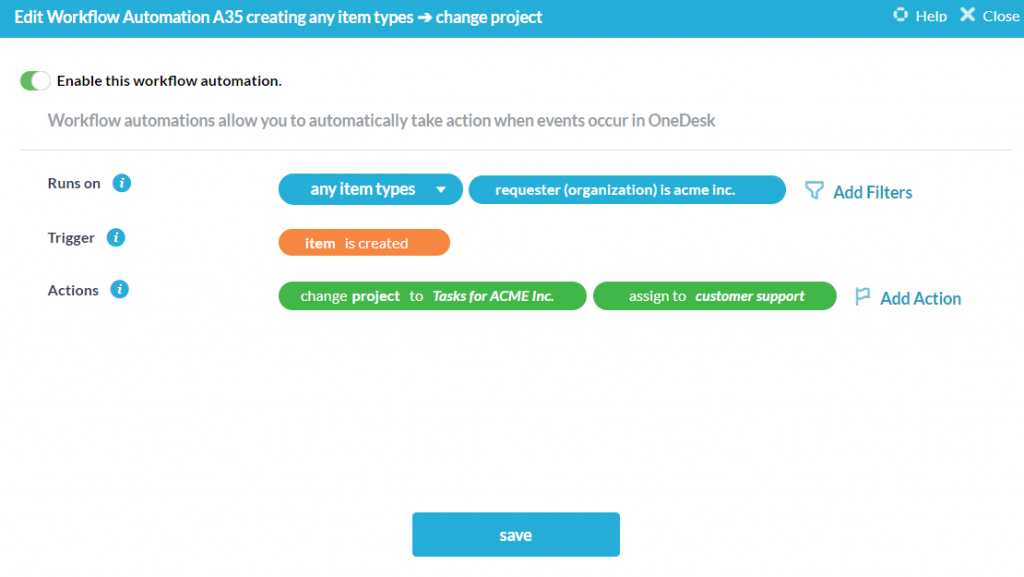
The first one you will want to create is one that places incoming tickets into a dedicated project for the Customer organization, as follows.
Create the following automation if you are working with external customers (Note: This automation is now created by default for new accounts. Check your automations and create this automation only if it does not exist already). This automation will create a customer project automatically for any new items submitted by customers if a designated project does not already exist.
OneDesk maintains a list of other useful automations, which you can access here.
5.1 (Optional) Routing for External-Service Organizations
Alternatively to the above automation, you can route tickets of specific customer organizations at the organization level. Do this under more applications > Customers > [the customer organization you want to set up routing rules for].
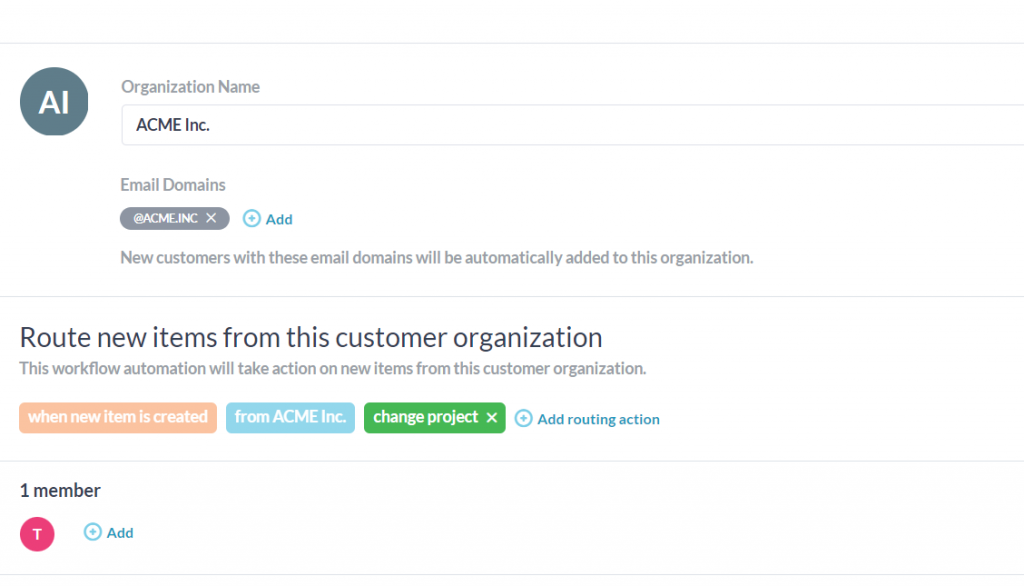
Here you can choose what happens to items submitted by this organization. Selecting “Add Routing Section” will prompt you to fill out the action of a pre-filled automation.
For example, you can automatically assign a team or user to any tickets created by a customer organization. This is useful if you have entire teams or users dedicated to certain clients.
External Quick-Start Step 3: Customer Apps
When serving external customers, a large amount of your communication will be handled through OneDesk’s customer applications.
Organizations serving external customers will embed the customer apps widget onto the homepage of their website. This is the recommended way of exposing these apps to your customers, since it allows you to add or remove customer-facing apps directly from within OneDesk Admin.
However, links to individual customer application pages can also be placed in the support section of your website, or embedded as iFrames.
More information on embedding:
Now you are done configuring OneDesk quickly for external customers, and can get started on your work.