What are the tickets and tasks portals?
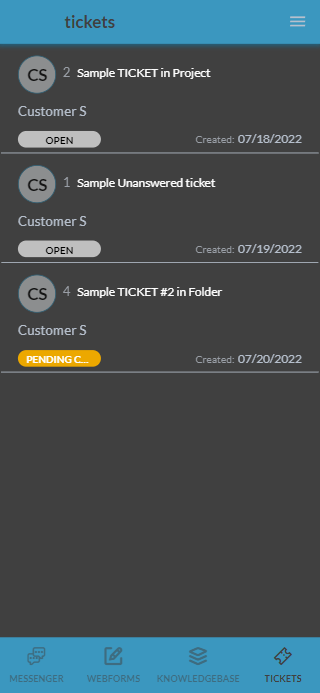
Along with the knowledgebase and messenger, the tickets and tasks portals are available as new mobile-friendly web applications. The Classic Portal is also still available. The ticket and task portals are tools for your clients, customers, or end-users. These new tickets and tasks portals allow customers to view, update, discuss, and log timesheets on submitted tickets/tasks. There are a few differences between the classic portal and the tickets/tasks portals. The tickets/tasks portals keep tickets and tasks separated in their own portals. The tickets/task portal are more optimized for mobile phones and tablets. There are also some differences in appearance and functionality. Learn more in the article: Classic vs. MFA.
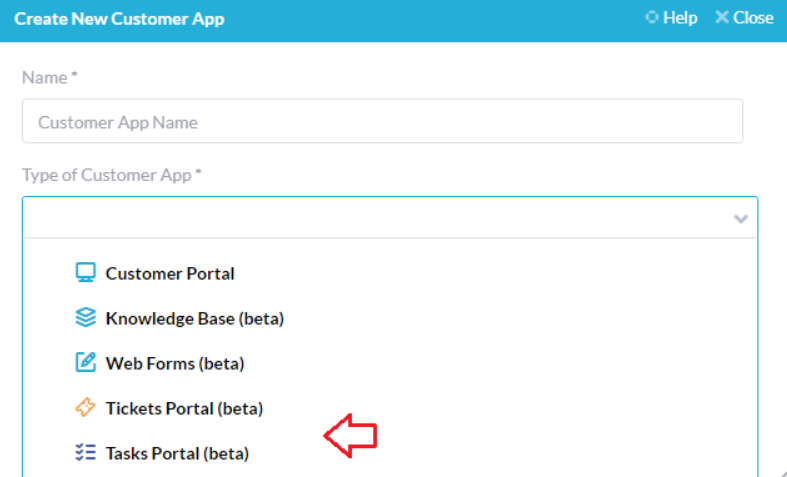
Create a new tickets/tasks portal
- To create a new customer app. Go to: Administration–> Customer Apps –> Create Customer App.
- From the dropdown menu, select to create either the tickets or tasks portal. Name your new application and click “Create.”
Configure which items a customer can see
Go to Administration → “your task/ticket portal’s name”
By default, customers can view items they requested, are following, or are requested by other customers in their organization, and items in the project they are following.
(Note: Customers are automatically followers on any items they have created.) Items requested by others in their organization means a customer from ABC Company would see all items created by other customers who belong to ABC Company. Learn more about customer organizations: About Customers & Organizations

You may unselect one or both of the above options, however the default settings of having both checked should work for most companies. It is not recommended to uncheck both boxes.
If you only check the box “Items in the projects they are following.” The customer will see all tickets/tasks contained within the projects they (or their customer organization) are currently following (shared). You can add customers as followers to projects from the Projects app.
You can also select if you want customers to only be able to view certain types of tickets/tasks. Simply check on or off the desired Ticket/Task types in the Ticket/Task Portal settings. Customers will see those ticket/task types that fall into the categories you previously selected.
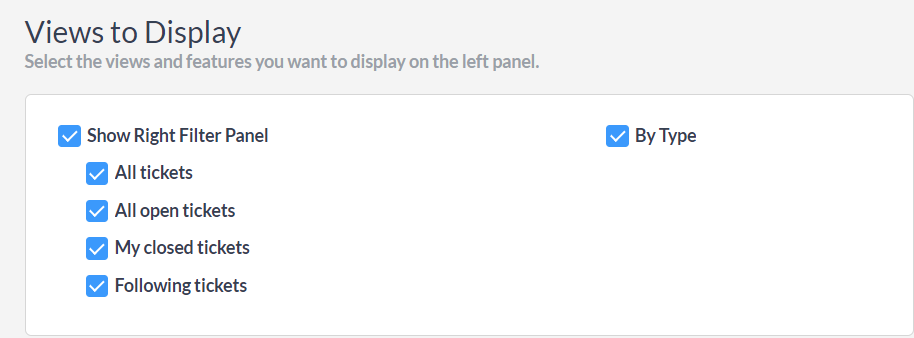
Filter View panel
On the Mobile Friendly OneDesk, customers can filter the view of their items from the right side panel. You can remove this feature entirely or configure which view filters are available.
Configure by going to Administration → “ticket/task portal name“
Configure item details a customer can see
Administration → “task/ticket portal’s name” → scroll to Detail Panel
You may select what details of the ticket you want a customer to be able to see (i.e. ticket priority, % complete, etc.).
Adding a detail property
To add a detail field to the customer view, click “Add another property” to the detail panel, and select the desired property. Note: The properties available for view in the ticket/task portal correspond to all the available fields in your tickets/tasks, including any custom fields you’ve made. For more on creating custom fields: Configuring Custom Fields

Remove a detail Property
To remove a property from a customer’s view, click the X under the “Actions” column.
Configure the details a customer can edit
You can allow customers to edit selected details within a ticket/task via the portal.
- Administration → “task/ticket portal’s name” → scroll to Detail Panel
- Check the box under the editable column to enable editing or uncheck the box to disable editing.
IMPORTANT NOTE: When previewing your portal it may appear differently than your settings. Since you will be logged in as a user, the configuration settings may be those of a USER not a CUSTOMER. Please ensure you are logged in with a Customer account to see what a customer will see.