One of the great aspects of OneDesk is the level of customization it supports. With OneDesk, you can configure unique statuses, forms, workflows, and much more. Regardless of what industry you work in, OneDesk can be configured in a variety of ways to fit your needs. In today’s blog I’m going to talk about one useful feature you can use to configure your account.
About custom fields
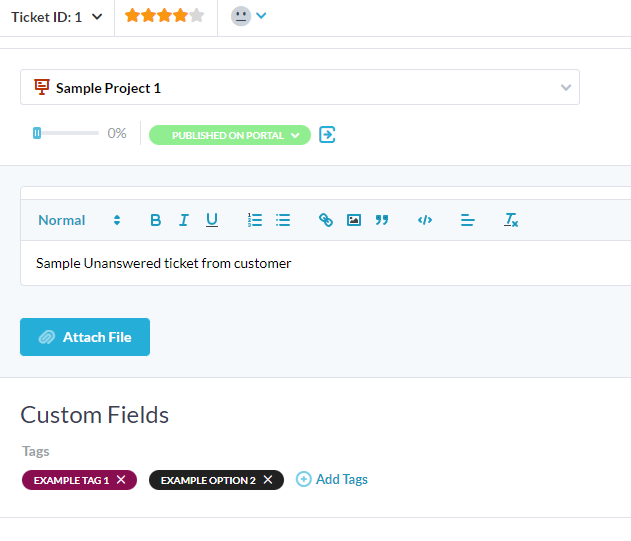
Custom fields are properties which can be added to detail panels, internal creation forms, or customer-facing webforms. Custom fields provide a way to capture or store additional and specialized information. For example, a custom field can be on the detail panel of a ticket. In this case the field will be available for agents to fill out when working on the ticket’s resolution.
Aside from storing or capturing information, custom fields can also be used for:
Why use a custom field?
Your work items, user profiles, customer profiles, and so on, all have a number of default properties. For example, tickets have properties such as the status and description. But every company is different. That’s where custom fields come in. Custom fields allow you to create unique properties. A custom field is created by giving it a name and selecting a data type. The data type is essentially the ‘kind’ of custom field. Certain data types permit certain information and not others. Aside from capturing information, custom fields allow you to customize your workflows as well. For example, you can create custom automation rules to perform actions based on the information in a custom field. We’ll see some examples later.
Custom field data types
Custom fields can be any of the following data types:
Text – Intended for short text typically less than 30 characters.
Number – Intended for numerical values.
Date – Intended for a day, month, year value. Contains a calendar selection component.
Cost – Intended for numerical values with a currency symbol (set per your comp prefs).
Choice – Intended for one selection from a series of custom options. Appears as a dropdown menu.
Tag – Intended for a multi-selection from a series of custom options. Appears as colored bubbles.
Rich Text – Intended for longer text including formatted text, images, etc.
You can also apply ‘conditions’ to fields. Conditions allow you to create some logic of when a field appears. For example if the user selects ‘Field A’, then ‘Field B’ will appear. See: Conditional Custom Fields
How custom fields work
Once a custom field is created, you can decide where you want it to appear.
Custom fields can be added to the detail panel of: Tickets, tasks, features, projects, users, customers, timesheets, customer organizations. You can add the field upon creation, or by going to the appropriate item’s Administration→ Detail Panel Properties. See also: Detail Panel Properties
Custom fields can be limited to certain projects. The field will be hidden from the project(s) you do not add it to. You can see which project a field appears in from Administration → Custom Fields.
Custom fields can be added to the creation form of tickets/tasks/timesheets. Internal forms are the form(s) used when users (agents) create something from the ‘Add’ button. See also: Internal Creation Form.
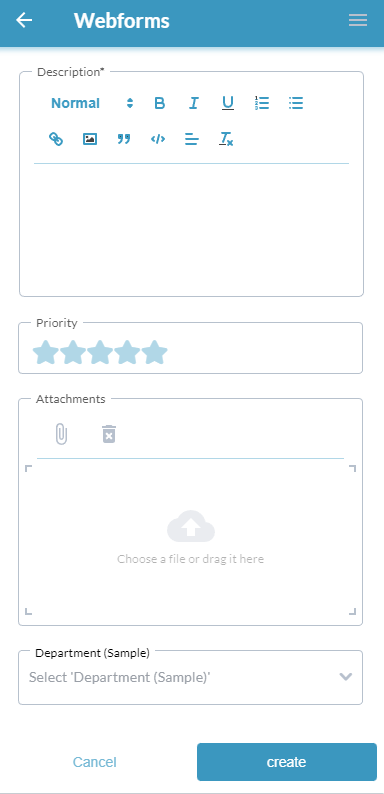
Custom fields can be added to webforms (the customer-facing form). Add fields to your form from Administration → Webforms. See also: Webforms.
Access custom fields settings
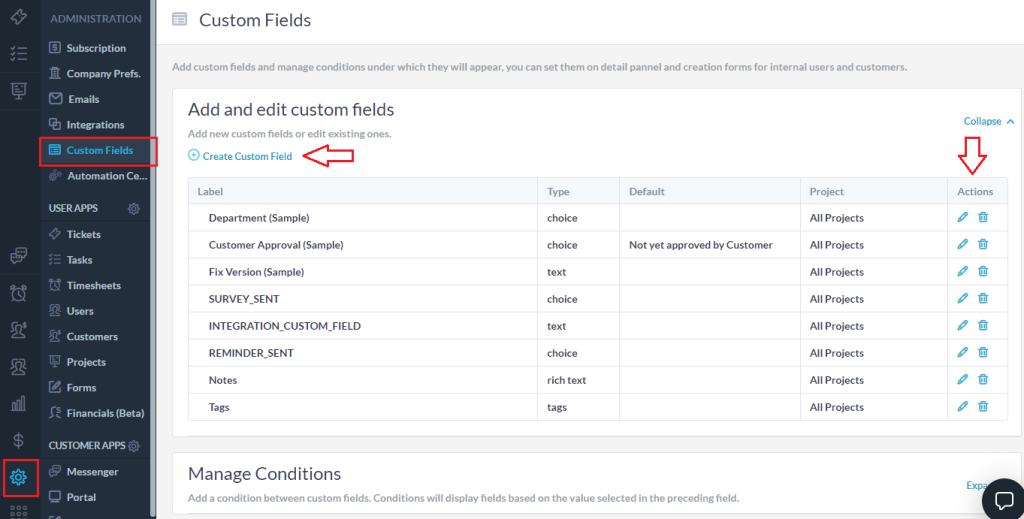
Administration → Custom Fields → Expand → Add and edit custom fields
Here you can view all fields, its type, defaults and the project(s) it appears on.
Edit fields – Click the pencil icon beside the custom field to edit. You can edit the name, default or where the field appears. You cannot change a custom field’s type after it has been created.
Delete fields – Click the ‘trash’ icon beside the field to delete it. Note: Deleting a custom field will remove it from any forms and delete any information captured in the field.
Create a custom field
Administration → Custom Fields → Expand Add and edit custom fields → Create Custom Field
- Give the field a name and data type.
- Select the detail panel you want it to appear. It will not be visible until it has been added to a detail panel.
- For choice type fields you will need to define options. (Enter the option name then hit enter, you can then enter the next option name).
- Set a default for the field (optional).
(Once created you can add the field to internal forms or customer-facing webforms. Go to Admin → Forms. Or, Admin → Webforms)
Automating with custom fields
Custom fields are flexible for creating custom workflows or routing configurations. Custom fields can be used as a filter, trigger condition, or updated via an automation action. Here are a few examples of popular custom field automation use cases:
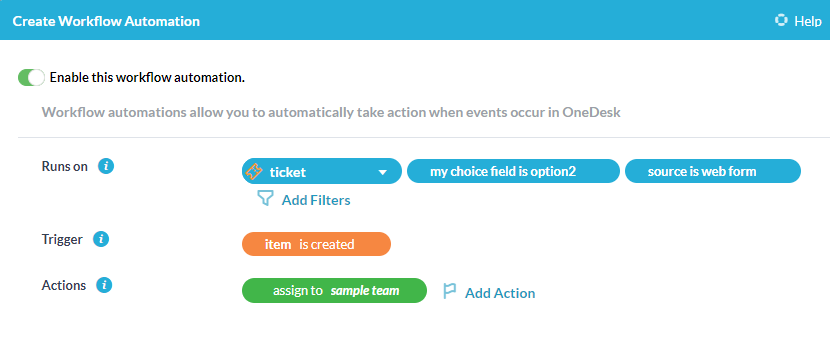
Routing/assigning a ticket based on a webform selection
Add your custom field to a webform. When a customer fills in this custom field and submits a ticket, you can automatically take action on this ticket based on what was selected in the custom field. This automation works best with a choice field. There are several actions you can choose for this automation, such as moving the ticket to a certain project, or assigning it to someone.
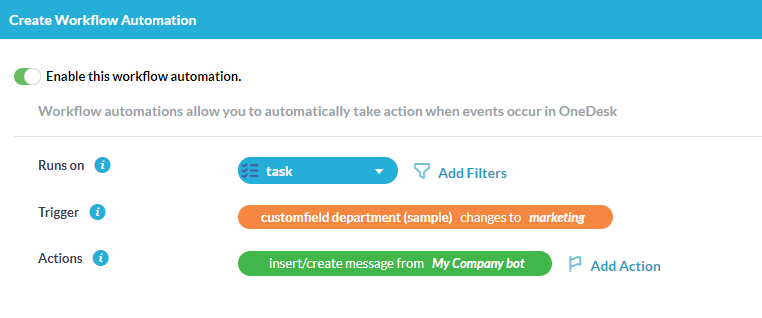
Updating/moving an item based on a custom field change
Perform an action based on changes made to a custom field. For example, send a message to the team when a field is filled out, or re-assign a task when a field changes.
Reporting with custom fields
You can add custom field properties to your report templates. A custom field property becomes usable in reports upon adding the field to the items detail panel. For example, you can report on a ticket custom field if that custom field appears on the ticket detail panel. Learn more about creating specific reports in our knowledgebase article.
Some example custom fields
Not sure what kind of custom fields might be helpful for your organization? Here are a few ideas to spark your imagination!
Version number field – Capture the version number. Create a ‘number’ data type field.
Department location field – Have multiple locations or departments? Create a ‘choice’ type custom field.
Issue type tag field – Want to keep track of the ypes of tickets you are getting? Create a ‘tag’ type custom field.