The January 2021 release of OneDesk introduced the idea of subtasks to OneDesk. This article shows you how you can use subtasks as well as provides some details of how they work and different ways you can use them.
What Are Subtasks For?
Subtasks are tasks that represent the break-down of larger tasks into smaller pieces. You may do this for a variety of reasons, such as:
- Making it easier to track the status of a task on a more granular level
- Developing a better understanding of the work required to complete the main task
- Assigning different parts of a task to different people or teams
- Organizing the sub-tasks into different projects
- Keeping the discussions on-topic is easier with more defined tasks
- Working on different parts of a task in parallel, while still tracking the status of the parts

What Are Subtasks in OneDesk?
In OneDesk, subtasks are first-class citizens and as such are full-fledged items like any other. When you create a subtask in OneDesk you are creating a real task that is linked to the main task via an ‘Item-to-Subtask’ relationship. This means that you can unlink it if you want, delete it, assign it separately, move it to another project and update its status. There is almost nothing that you can do on a task, that you cannot do on a subtask.
Subtasks can actually be any type of item. So if you want to have a ticket with sub-tickets, or a ticket with subtasks, you can do that too. We call them subtasks because nobody knows what a “subitem” is, and because ‘task’ is the default type.
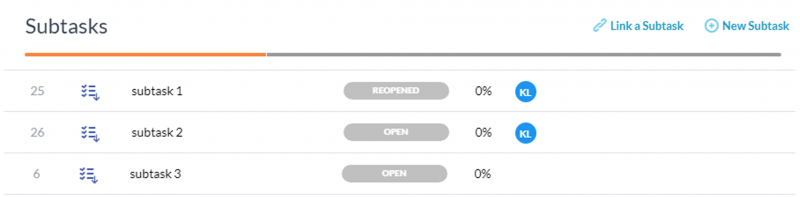
Subtasks are displayed on the ‘main item’ as a list on the ‘Subtasks & Links’ tab. Subtasks also have a small badge on their type icon.
Two Ways You Can Use Subtasks in Your Workflows
Your ticket-to-task workflow
A common experience for many of our users is to receive a ticket from a customer. Sometimes they can simply work on the ticket and resolve it, but sometimes that ticket can spawn one or more tasks. They want the tasks to be assigned and managed separately.
In OneDesk we support this workflow. Simply create one or more subtasks from the ticket. They can be created in different projects (or moved there afterward). They can be assigned and worked on, and when their statuses are updated, they are displayed on the ticket.
If you want to link a ticket with an existing task you can do that too.
Move your subtasks around in your task hierarchy
Normally when you break-down tasks into smaller pieces you will use the project/task hierarchy. This is a powerful feature in OneDesk since it can have unlimited depth, rolls up values automatically, and is quite flexible. However, there can be cases where you do not want a subtask to live directly below a parent task, and wish to move it to a different location, or even to a different project.
If you use subtasks, OneDesk allows you to create (or link to) a subtask no matter where it is located.
What Else You May Need to Know
Here are some things you may want to know about subtasks:
- You can only have one level of subtask. In other words, your subtasks cannot have subtasks.
- A subtask can only have one ‘parent’ or main task.
- The task-to-subtask links are directional. When looking on the subtasks tab in a subtask you will see the parent task shown.
- The organizational hierarchy (or tree) has no bearing on the subtask relationship. You can move things around here and not break the link.
- At the top of subtasks tab, you can see a rollup of the statuses of the subtasks. By default the % complete will rollup to the parent. You can configure % complete rollup as well as status rollup from your company preferences.
That’s it for now! You can expect some usability enhancements and fixes over time, and of course, we welcome your suggestions on how we can make this feature even better.